A one-car garage can become a serious woodworking space, but only if you stop treating it like a tiny version of a large shop.
The mistake is trying to fit the maximum number of machines into the room. The better goal is to preserve enough open space that the garage can change configuration as the project changes.
That matters even more if the garage still has to hold a car, bicycles, lawn equipment, household storage, or utilities.
In this guide, we use a 12 × 20 ft garage as a planning example. It is not a universal U.S. garage size. Real garages vary, and their usable interior space can be reduced by stairs, water heaters, HVAC equipment, electrical panels, doors, shelving, garage-door tracks, and other fixed obstacles.
The layout system below is designed around a more realistic question:
How do you make a one-car garage useful for woodworking without pretending it is empty all the time?
Quick Answer: Start With the Garage Mode, Not the Tool List
Before deciding where the table saw goes, decide how the garage itself will be used.
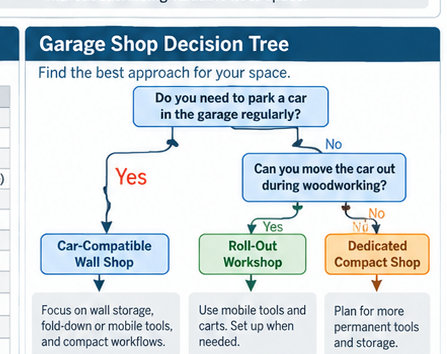
For most beginners, one of three models makes sense:
| Garage Model | Car Use | Best Strategy | Best For |
|---|---|---|---|
| Car-Compatible Wall Shop | Car regularly stays inside | Wall storage, fold-down surfaces, portable tools | Very shared spaces |
| Roll-Out Workshop | Car leaves while you work | Mobile carts and machines roll into open floor space | Most hobbyists |
| Dedicated Compact Shop | Garage is mostly a workshop | Selected permanent stations plus flexible central space | Frequent woodworking |
The important distinction is not whether a tool is “good for a small shop.” It is whether that tool can be used without destroying the space needed to move material through the shop.
The Core Rule: Protect the Floor First
In a one-car garage, floor space is usually more valuable than storage volume.
A cabinet sitting permanently on the floor does more than occupy its own footprint. It can also remove turning room for plywood, block a board’s path through a saw, prevent a cart from moving, or make it impossible to park the car.
That leads to the first KuduPost rule for a small garage shop:
Protect the floor first. Put storage on walls, under work surfaces, or above safe clearances before filling the room with permanent floor-standing cabinets.
This does not mean every object belongs on a wall or ceiling. Heavy overhead storage requires proper structural support, and nothing should interfere with garage-door tracks, springs, openers, electrical equipment, or required access to utilities.
The principle is simply that every permanent object on the floor should justify the flexibility it removes.
Step 1: Measure the Garage You Actually Have
Do not begin with a floor plan from the internet.
Measure the usable room.
Record:
- interior width and depth
- garage-door opening
- ceiling height
- interior doors
- windows
- stairs or steps
- electrical panel location
- receptacle locations
- water heater or HVAC equipment
- garage-door tracks and opener
- existing storage
- the actual parked position of the vehicle
Then mark anything that should not be blocked.
The result is your real shop envelope, which is usually smaller and less rectangular than the advertised garage dimensions.
Step 2: Choose Your Garage Mode
Model A: Car-Compatible Wall Shop
This is the hardest layout because the car remains the dominant floor object.
The workshop should almost disappear when it is closed.
A practical version may use:
- shallow wall storage
- a fold-down or narrow wall bench
- portable circular or track-style cutting tools
- hand tools stored on a wall system
- benchtop tools stored until needed
- a compact shop vacuum
- folding work supports
Large stationary machines are difficult to justify because they consume parking and movement space even when woodworking is not happening.
A guided circular saw can handle many early sheet-goods operations and may allow a beginner to postpone a table saw without pretending that the two tools are identical.
Model B: Roll-Out Workshop
For many one-car garages, this is the most useful compromise.
The car leaves when woodworking starts. Tools stored against the wall roll into the open center of the garage. When the session ends, the equipment returns to the perimeter and the car comes back in.
The ideal mobile item is not simply “anything with wheels.” It is something that gains useful operating space by moving.
Good candidates often include:
- table saw
- planer
- router table
- assembly table
- shop vacuum
- portable workbench
The advantage is that the same center floor area can serve several tools at different times.
Model C: Dedicated Compact Shop
If the garage no longer needs to function as regular parking, more permanent stations become possible.
Even then, filling the entire room with machines is usually a mistake.
A useful dedicated one-car shop can still preserve a clear central path so long boards, plywood, carts and people can move through the room.
Permanent stations should be chosen because they are used frequently enough to deserve permanent space.
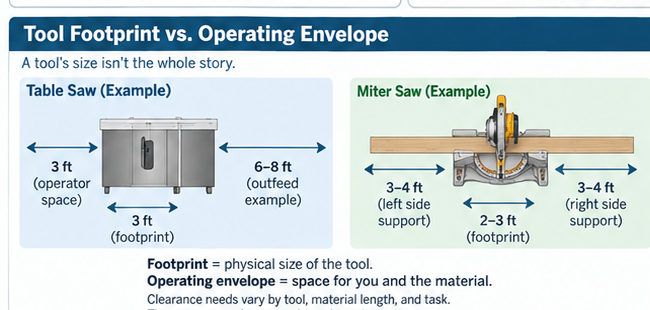
Footprint Is Not the Same as Usable Shop Space
This is one of the most important concepts in a small workshop.
A machine has at least two different dimensions:
- Physical footprint — the space occupied by the machine itself.
- Operating envelope — the machine plus the material path, operator position, controls and safe movement around the work.
A small table saw can occupy a compact square when parked against a wall. The moment you cut a long board or sheet, however, the useful shop space extends far beyond the saw.
The same problem appears with:
- a planer processing long boards
- a miter saw supporting long stock
- a jointer
- a router table
- a workbench during assembly
That is why a one-car shop should be designed around material paths, not machine rectangles.
A Simple Way to Calculate an Operating Envelope
You do not need a universal clearance chart.
Instead, ask four questions for each tool:
- What is the longest or widest material I expect to process?
- Where does that material enter?
- Where does it leave?
- Where must I stand to control the operation?
For example, if you expect to process an 8-foot board through a planer, the board’s travel path matters far more than the planer’s parked footprint.
If you rarely work with 8-foot stock, designing the entire garage around that maximum length may waste space.
Design for your normal projects, then create a temporary strategy for occasional oversized work.
What Should Be Mobile?
Mobility should solve a spatial problem.
| Tool or Station | Typical Small-Garage Strategy | Why |
|---|---|---|
| Assembly table | Often mobile or folding | Consumes large floor area but can serve many jobs |
| Table saw | Mobile if the garage is shared | Moving it can create infeed/outfeed clearance |
| Planer | Store or roll out when needed | Needs long temporary material paths |
| Shop vacuum | Mobile | Can follow the active tool and reduce long hose runs |
| Router table | Mobile, nested or integrated | Often used intermittently |
| Miter saw | Wall station or portable stand | Choice depends on how often long stock is cut |
| Lumber storage | Usually fixed to a suitable wall structure | Moving lumber storage wastes setup time |
| Hand tools | Wall or drawer storage | No reason to consume separate floor stands |
A useful test is:
If moving this tool does not create meaningful working clearance, casters may add complexity without adding useful space.
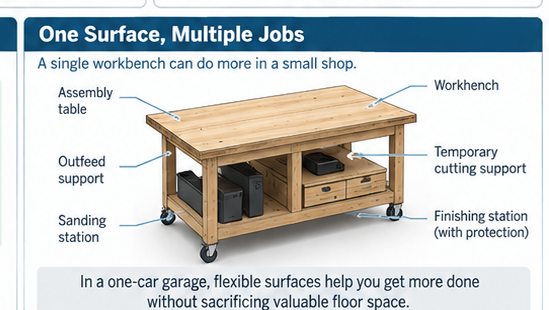
The KuduPost “One Surface, Multiple Jobs” Rule
A one-car garage usually does not have enough floor area for a dedicated assembly table, sanding table, glue-up bench, outfeed table and general workbench.
Instead, one well-designed surface can perform several roles.
A central mobile workbench might serve as:
- assembly surface
- clamping table
- sanding station
- temporary project staging
- compatible outfeed support when correctly positioned for the specific tool
The goal is not to make one table perform every operation simultaneously.
The goal is to avoid five separate surfaces that each spend most of the week unused.
Planning Example: A 12 × 20 ft One-Car Garage
We use 12 × 20 ft only as a planning example so the spatial logic can be shown with concrete geometry.
It should not be treated as a universal standard.
Layout A: Car In
When the car is parked, keep the shop compressed to the perimeter.
A practical arrangement is:
- shallow tool storage on one long wall
- a narrow or folding bench along the opposite or rear wall where the vehicle allows it
- portable tools stored under the bench
- folding sawhorses stored vertically
- vacuum parked under a work surface
- a clear path to the house door, panel and utilities
In this mode, the room is storage plus parking, not an active machine shop.
Layout B: Car Out
Once the car leaves, the central floor becomes the active work zone.
The rolling workbench moves toward the center.
The table saw, if owned, moves only far enough to create the material path needed for the current operation.
The planer can roll into that same path later.
The same floor area is therefore reused instead of permanently assigned.
The 4×8 Plywood Problem Returns
A full 4×8 sheet is awkward in a small garage for a reason that has nothing to do with the saw.
The sheet itself needs room to:
- enter the garage
- rotate
- lie flat
- be supported
- move through the cut
A compact machine does not solve those geometry problems.
Useful strategies include:
- breaking the sheet into rough sections before bringing it deep into the shop
- using a guided circular saw on a properly supported temporary surface
- using smaller project panels when practical
- requesting transport cuts from a retailer when available, while treating those as rough cuts rather than precision joinery cuts
If a full sheet only appears in one project every few months, it may be better to create a temporary sheet-processing workflow than to permanently dedicate the shop to full-sheet handling.
Storage: Use the Walls Without Making Them Hostile
Vertical storage is valuable, but covering every wall with deep cabinets creates another problem: the room becomes physically narrower at shoulder and material height.
Use shallow storage where possible.
Good candidates include:
- hand-tool panels
- French-cleat systems
- pegboard
- shallow cabinets
- drawer units under benches
- wall-mounted clamp storage
- appropriately supported lumber racks
Be cautious with overhead storage. Do not assume roof trusses, ceiling joists or garage-door framing are designed for whatever load you want to hang from them. Structural loading is a building-specific question.
Also preserve access to electrical panels, mechanical equipment and garage-door hardware.
Electrical Planning: Inventory the Circuit Before Buying More Machines
A garage workshop should not begin with assumptions about the electrical system.
Homes differ by age, jurisdiction, remodel history and adopted electrical-code edition.
Current National Electrical Code provisions include specific requirements for dwelling-unit garage receptacle circuits and GFCI protection, but the installation in an individual home must be evaluated against the code adopted locally and the actual wiring present.
For a beginner, the useful planning process is:
- identify which receptacles are on which circuit
- check the breaker rating
- read the tool nameplates and manuals
- identify which tools are likely to operate simultaneously
- include the shop vacuum or dust extractor in that calculation
Do not assume that because two tools plug into the wall at the same time they should run on the same branch circuit.
Motor loads can also behave differently during startup than they do while running.
If your intended setup exceeds what the existing garage electrical system can reasonably support, have a qualified electrician evaluate additional circuit capacity rather than improvising a wiring solution.
Extension Cords Are Not Extra Circuits
An extension cord changes where the connection reaches. It does not increase the electrical capacity available from the branch circuit.
The U.S. Consumer Product Safety Commission advises against overloading extension cords and recommends using cords suitable for the intended current, replacing damaged cords and using outdoor-rated cords where applicable.
For woodworking tools, use the tool manufacturer’s cord guidance and the cord’s own rating rather than relying on a single universal wire-gauge rule.
Longer cords and higher-current tools require more careful selection.
Dust Control: Capture Dust Where It Is Created
An open garage door is useful for access and ventilation, but it is not a complete dust-control system.
Fine dust can remain airborne, settle across the shop and migrate toward the house.
A practical small-garage strategy is to start at the tool:
- Use source capture where the tool supports it.
- Vacuum surfaces rather than relying only on sweeping.
- Use supplementary room filtration if appropriate for the shop.
- Select personal protective equipment for the task and product instructions.
NIOSH lists a recommended occupational exposure limit for wood dust of 1 mg/m³ as a time-weighted average and identifies respiratory and other health effects from exposure. These are occupational-health values, not a residential “safe line” for hobby garages.
The takeaway for a home shop is simpler: reducing airborne wood dust is worthwhile even when you are not measuring exposure concentration.
Attached Garage? Treat the House as a Separate Clean Zone
If the workshop shares a wall or door with living space, dust control becomes even more important.
Do not intentionally route woodworking dust into the home’s HVAC system.
Keep the interior connection to the house closed while creating dust, and clean yourself and the immediate shop area before carrying dusty materials indoors.
Do not modify fire-separation assemblies, doors, vents or building systems based on generic internet advice. Requirements vary by building and jurisdiction.
Finishing Requires a Different Shop Mode
The same garage used for cutting and sanding can be a poor finishing environment if dust is still being generated.
Separate dusty operations from finishing in time.
Before applying a finish:
- clean the project and nearby surfaces
- follow the finish manufacturer’s ventilation instructions
- review the label and Safety Data Sheet when applicable
- keep the product away from ignition sources as directed
- handle application rags according to the product instructions and fire-safety guidance
Oily rags deserve special attention. Fire departments have documented fires caused by oil-contaminated rags self-heating when piled or stored with poor ventilation.
Do not invent a disposal method for a specific finish. Follow the product label and local fire/waste guidance.
Noise: Your Hearing and Your Neighborhood Are Different Problems
Hearing protection addresses the sound level reaching you.
Neighborhood rules address the sound leaving the garage.
Those are different standards.
Planers, routers, saws and shop vacuums can be loud enough that personal hearing protection deserves serious consideration, while acceptable hours for running noisy equipment depend on local ordinances, leases, HOA rules and neighbor proximity.
Opening the garage door may improve access and airflow while also making outdoor noise more noticeable.
Check the rules that apply where you live instead of assuming a universal woodworking schedule.
Do You Need a Permanent Miter-Saw Station?
Not automatically.
A wall-to-wall miter station can look efficient, but it consumes a large amount of wall length for one operation.
It makes the most sense when your projects repeatedly use long dimensional lumber and frequent crosscuts.
If you use a miter saw only occasionally, a portable stand or temporary bench position may preserve more useful storage and assembly space.
This is a good example of a broader principle:
Frequency should earn permanence.
A tool used constantly deserves easier access.
A tool used once every few projects may be better stored until needed.
Should You Put Every Machine on Wheels?
No.
Mobility has costs:
- casters add height
- bases add footprint
- machines still need somewhere to park
- locking and leveling take time
- cords and dust hoses still need management
Use mobility where it unlocks another configuration of the garage.
That is very different from putting casters on everything.
The One-Car Garage Shop Layout Matrix
| Question | Car-Compatible Wall Shop | Roll-Out Workshop | Dedicated Compact Shop |
|---|---|---|---|
| Car parks inside regularly? | Yes | Yes, when shop is closed | Usually no |
| Permanent center island? | No | No | Possible |
| Mobile machines important? | Limited; prefer portable tools | Very important | Selective |
| Best sheet-goods strategy | Temporary breakdown setup | Use cleared center/doorway path | Dedicated or semi-permanent workflow possible |
| Setup time | Higher | Moderate | Lower |
| Storage strategy | Wall-heavy | Wall + under-cart | Wall + selected floor cabinets |
| Best advantage | Preserves parking | Best flexibility | Fastest start-to-work time |
| Main limitation | Least machine capacity | Requires setup/reset | Consumes garage for woodworking |
Which Layout Would We Choose for Most Beginners?
For a beginner who owns a one-car garage but still needs it for household use, the Roll-Out Workshop is the strongest default.
It avoids two expensive mistakes:
1. Buying a room full of stationary machines before understanding your workflow.
2. Designing the garage as though the car and household storage no longer exist.
Start with perimeter storage, one multi-purpose work surface, portable or mobile cutting tools, and a clear central floor.
Then allow repeated project problems to justify permanent equipment.
A Beginner Setup Sequence That Keeps the Garage Flexible
- Measure the real room. Include every fixed obstacle.
- Park the car. Mark what floor and wall space remains accessible.
- Choose Car-In, Roll-Out or Dedicated mode.
- Reserve material paths before tool parking spots.
- Create one useful work surface.
- Move small-tool storage to the wall or under the bench.
- Add source dust capture.
- Map the electrical circuits before combining high-draw loads.
- Add mobile bases only where movement creates real operating space.
- Upgrade when repeated projects expose a limitation.
Final Verdict
A good one-car garage woodworking shop is not the one with the most machines.
It is the one that can switch from storage to cutting to assembly to cleanup without forcing you to rebuild the entire room every time.
For most shared garages, that means:
- protect the floor
- use the walls intelligently
- design around operating envelopes
- make selected tools mobile
- reuse one work surface for several jobs
- treat full sheets and long boards as temporary geometry problems
- verify electrical capacity instead of assuming it
- capture dust at the source
And if your garage is so full that even a roll-out system is unrealistic, the better answer may be a more portable setup. Our guide to starting woodworking without a garage covers that approach separately.
The goal is not to make a one-car garage look like a professional cabinet shop.
The goal is to create enough capability to build the projects you actually want to make — while keeping the space useful for the rest of your life.
Sources and Technical References
- National Fire Protection Association — NEC materials regarding dwelling-unit garage branch circuits and GFCI provisions. Local adoption and edition vary.
- U.S. Consumer Product Safety Commission — Extension Cord Safety and Home Power Tool Safety guidance.
- NIOSH Pocket Guide to Chemical Hazards — Wood Dust.
- OSHA 29 CFR 1910.133 — Eye and Face Protection.
- OSHA 29 CFR 1910.243 — Guarding of Portable Powered Tools.
- Cambridge Fire Department — documented 2026 fires involving spontaneous combustion of oily rags.
Editorial note: KuduPost does not present occupational exposure limits or workplace regulations as universal residential hobby-shop requirements. Safety-sensitive claims in this article are used as technical context and should be combined with manufacturer instructions, the conditions of your own shop, and applicable local requirements.