Searching for beginner woodworking projects can create a strange problem: the more ideas you find, the harder it becomes to choose one.
A picture frame has only four pieces, but accurate miters can make it frustrating. A cutting board looks simple, but many versions assume you can joint, glue, flatten, and finish a panel. A large table may use straightforward joints but still demand more lumber, workspace, and error recovery than a first project deserves.
So KuduPost ranked seven projects differently.
We do not rank a project by how simple the finished object looks. We rank it by how forgiving the build is for a beginner.
Our ranking prioritizes:
- Error tolerance — how damaging is a small measuring or cutting mistake?
- Tool burden — how many capabilities do you need before you can begin?
- Transferable skill value — does the project teach skills you will use again?
- Failure cost — if one part goes wrong, how painful is the recovery?
- Workspace, time, and usefulness — important tie-breakers, but not the whole ranking.
The result is not a list of the seven cheapest projects. It is a list of seven projects that create a useful progression from first cuts to basic furniture geometry.
The Ranking at a Glance
| Rank | Project | Difficulty | Tool Burden | Consumed Material | Active Time | Error Tolerance |
|---|---|---|---|---|---|---|
| #1 | Simple Wooden Storage Box | 2/5 | Low | ~$11–$14 | 2.5–3.5 hr | High |
| #2 | Wooden Tool Tote | 2/5 | Low | ~$18–$20 | 2.5–3.5 hr | High |
| #3 | Simple Coat Hook Rail | 1/5 build, 2/5 installed | Low | ~$14–$18 | 1–1.5 hr | High |
| #4 | Rustic Planter Box | 2/5 | Low | ~$10–$16 | 2–3 hr | Very High |
| #5 | Species-Specific Nest Box | 2/5 | Low–Medium | ~$15–$22 | 2–3 hr | Medium |
| #6 | Pair of Basic Sawhorses | 3/5 | Medium | ~$18–$25 | 3–4 hr | Medium |
| #7 | Simple Side Table | 3/5 | Medium | ~$30–$50 | 4–6 hr | Medium-Low |
Cost note: “Consumed material” estimates the portion of lumber, hardware, glue, and other supplies that ends up in the project. Your checkout cost can be higher because boards, screws, glue, and finish are sold in larger units. Prices also vary by location and retailer.
How We Ranked These Beginner Woodworking Projects
Small does not automatically mean beginner-friendly.
For this ranking, a strong first project should ideally:
- work with a small, general-purpose tool kit
- use surfaced dimensional lumber or small project panels
- avoid advanced joinery and precision hardware
- survive small dimensional errors without becoming unusable
- keep material loss inexpensive when a cut goes wrong
- teach skills that transfer to later projects
- produce something useful enough to make the effort feel worthwhile
If you do not yet have a basic tool system, start with our beginner woodworking tool buy-order guide. If you are choosing your first saw, see Circular Saw vs. Jigsaw vs. Miter Saw.
Why Error Tolerance Matters More Than Part Count
Imagine two projects.
Project A uses four pieces, but every corner is a miter. A small angle error opens a visible gap at the frame.
Project B uses five or six pieces with straightforward butt joints. If one dimension is slightly off, you can often trim, refit, or let the next part adapt to the real assembly.
Project B has more parts but may still be the better first project.
That is why KuduPost gives error tolerance the highest priority in this ranking.
#1 — Simple Wooden Storage Box
Best overall first project
A rectangular storage box wins because it teaches a surprising amount without requiring a large tool collection.
The KuduPost version uses factory-width pine walls and a plywood bottom. The key lesson is:
Square first. Fit second.
You cut matching wall pairs, dry-fit the frame, check it for square, then fit the bottom to the box you actually assembled.
That sequence gives a beginner several important skills at once:
- measuring and crosscutting
- matching opposite parts
- drilling and fastening
- clamping
- checking diagonals
- understanding inside vs. outside dimensions
- fitting the next component to real geometry
A small error does not automatically destroy the project. If both long walls match and both short walls match, a slightly different overall dimension can still produce a useful box.
Minimum capability: measure/mark, one suitable saw, drill/driver, square, clamps, hand sanding.
Estimated consumed material: about $11–$14.
Active build time: about 2.5–3.5 hours at a careful beginner pace.
Workspace: small bench or portable work surface.
See the complete Simple Wooden Storage Box plan and cut list.
#2 — Wooden Tool Tote
Best for useful workshop storage
The Tool Tote adds a little more geometry without turning into an advanced project.
Compared with the Storage Box, it introduces:
- shaped end panels
- aligned handle holes
- a dowel handle
- an assembly sequence where final parts can adapt to the real build
The project is still based mostly on crosscuts and straightforward fastening, but handle alignment and shaped ends make it slightly more demanding than the box.
Its biggest advantage is utility: the finished project can immediately hold the tools and supplies you use on later builds.
Estimated consumed material: roughly $18–$20 based on the KuduPost plan’s board, dowel, fasteners, and adhesive use.
Active build time: roughly 2.5–3.5 hours for a careful beginner.
Error tolerance: high, especially because the plan delays final side and handle length until the main geometry is established.
See the complete Wooden Tool Tote plan.
#3 — Simple Coat Hook Rail
Best for layout practice
A coat hook rail can be one of the simplest useful woodworking builds: one surfaced board, a few hooks, sanding, optional finish, and wall mounting.
The woodworking itself is forgiving. The important lesson is layout consistency.
You practice:
- finding a centerline
- dividing a length into repeatable positions
- keeping hardware aligned
- drilling pilot holes
- installing the finished object appropriately for the wall and expected load
The distinction between building and installing matters here. Making the wood rail is a very easy project. Mounting it securely can require different anchors or attachment methods depending on the wall construction and load.
Representative version: approximately a 24-in rail from 1×4 stock with three hooks.
Estimated consumed material: roughly $14–$18, with the hardware contributing more to cost than the wood.
Active build time: roughly 1–1.5 hours, excluding finish cure.
Error tolerance: high for the woodworking; hardware spacing is visually noticeable but easy to lay out before drilling.
#4 — Rustic Planter Box
Most forgiving outdoor project
A small rectangular planter is a good beginner project because the design can intentionally tolerate small gaps and rustic variation.
A representative beginner version can use cedar fence pickets or readily available exterior-suitable stock, simple butt joints, and exterior-appropriate fasteners.
It teaches:
- repeated parts
- basic rectangular assembly
- outdoor material and finish decisions
- intentional drainage instead of trying to create a sealed wooden container
The main reason it does not rank higher is scale. Even a modest planter creates longer parts and a larger assembly than the first three projects.
Estimated consumed material: roughly $10–$16 for a small representative design. Current cedar fence-picket pricing checked during this article was roughly $3.75–$4.28 per 6-ft picket, before fasteners and finish.
Active build time: roughly 2–3 hours.
Error tolerance: very high for a rustic design.
#5 — Species-Specific Nest Box
Best for learning to follow a functional plan
A generic “birdhouse” is often presented as the perfect no-precision project. That is misleading.
A decorative birdhouse can be forgiving. A functional nest box has dimensions that matter to the target species, including entrance size, internal dimensions, placement, and access for maintenance.
For example, Cornell Lab’s NestWatch publishes species-specific nest-box plans and placement guidance rather than one universal birdhouse size.
That makes a nest box valuable for a different reason: it teaches the beginner to follow an external functional specification instead of improvising every measurement.
This also introduces a tool consideration the first four projects may not: creating the entrance opening can require an appropriate hole saw, large bit, or another safe cutting method supported by the plan.
Estimated consumed material: roughly $15–$22 for a representative box from surfaced lumber plus exterior-appropriate fasteners, depending on species plan and material.
Active build time: roughly 2–3 hours.
Error tolerance: medium. Cosmetic variation may be forgiving, but functional dimensions should follow the species-specific plan.
Important: use a recognized nest-box plan for the bird you are trying to attract rather than treating these dimensions as decoration.
#6 — Pair of Basic Sawhorses
Best project that improves your future workspace
A pair of sawhorses is useful because the project immediately becomes part of your shop setup.
Compared with a small box, however, it introduces more structural thinking:
- larger stock
- matching leg geometry
- stability on the floor
- cross-bracing or another rigidity strategy
- fastener placement in thicker lumber
Some sawhorse designs use angled or beveled cuts. Others are built specifically to simplify those operations. For this ranking, we assume a basic fixed pair built from common framing lumber—not a folding, adjustable, or fine-carpentry version.
Current U.S. pricing checked for this article showed common 2×4×8 framing lumber around $4 per board at a major home center, so the raw lumber can remain inexpensive even when the project uses several pieces.
Estimated consumed material: roughly $18–$25 for a basic pair, depending on the design, lumber price, and fasteners.
Active build time: roughly 3–4 hours for a careful beginner building a pair.
Workspace: driveway, garage, or other area where longer framing lumber can be supported safely.
#7 — Simple Side Table
Best first step into furniture geometry
A simple side table is where “beginner woodworking project” begins to overlap with basic furniture making.
The joints can still be straightforward, but the visual and structural demands increase:
- four legs should relate consistently to the floor
- aprons need to align
- the base needs to resist racking
- the top should sit in a controlled relationship to the base
- mismatched parts become easier to see
This makes the table an excellent seventh project: still approachable with a basic power-tool kit, but much less forgiving than a utility box.
For this comparison, the representative version is a small open-base side table made from surfaced softwood, with no drawer and no precision mitered joinery. Even this simplified version consumes several boards, so material cost and recovery cost are both higher than the earlier projects.
Estimated consumed material: roughly $30–$50 depending on the top, leg stock, hardware, and joinery method.
Active build time: roughly 4–6 hours, often spread across more than one session if glue and finish are involved.
Error tolerance: medium-low within this beginner list.
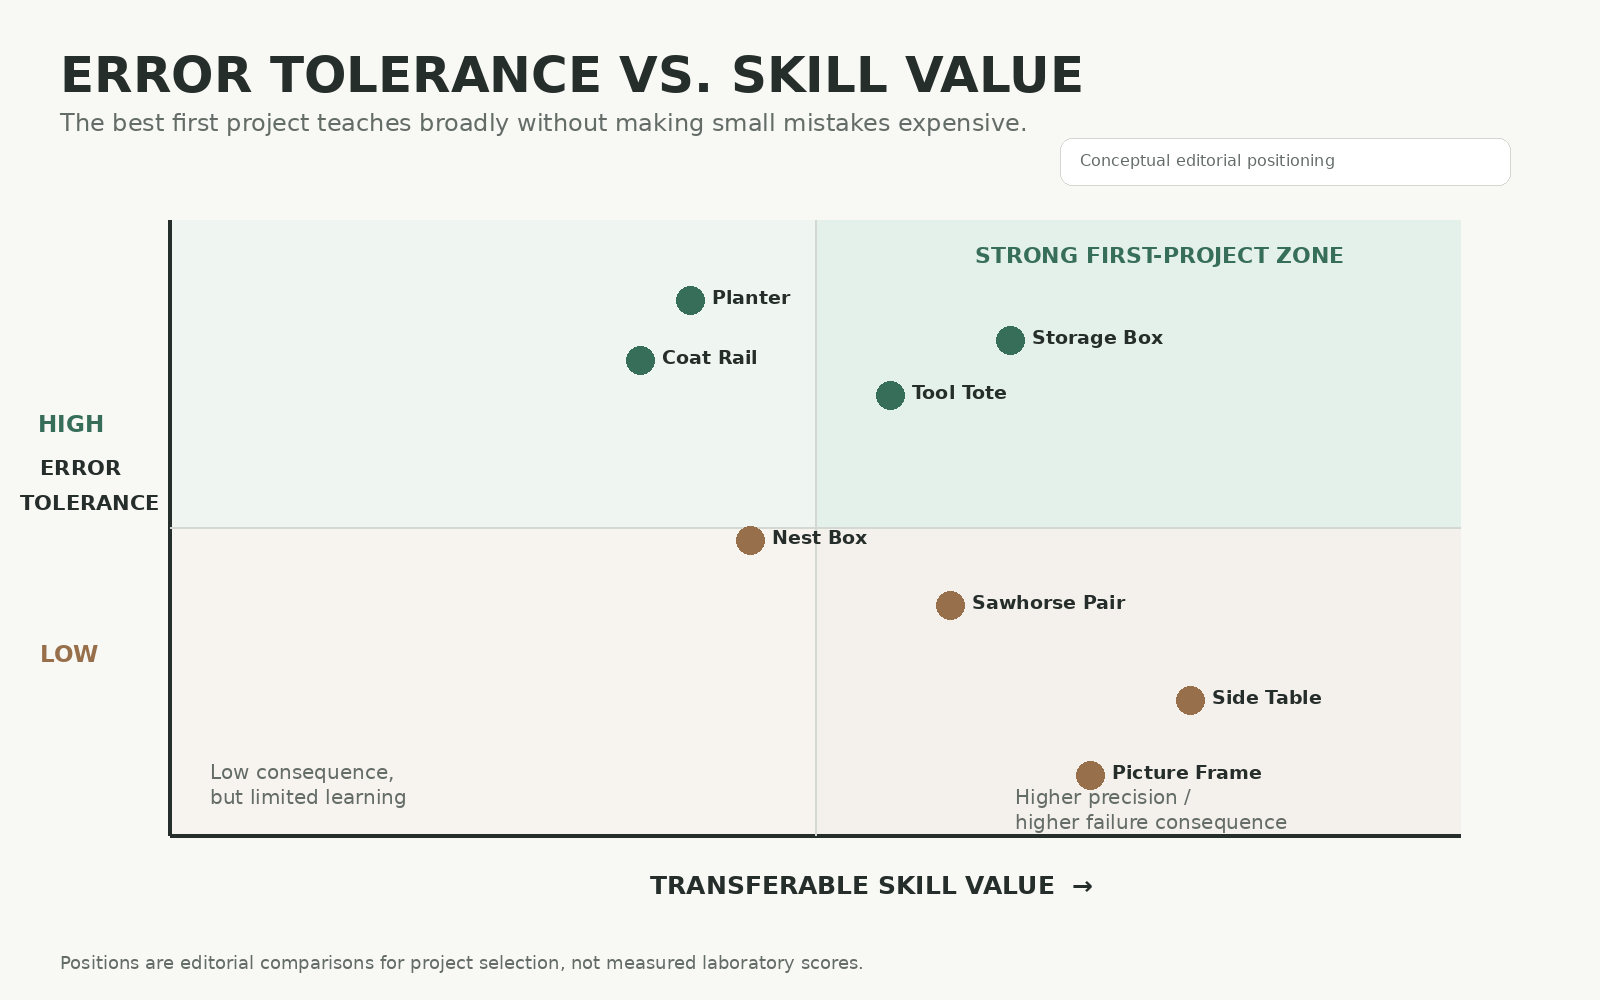
Error Tolerance vs. Skill Value
The best first project is not necessarily the project with the highest skill value.
A side table can teach more furniture-specific lessons than a storage box, but the box lets a beginner encounter mistakes at much lower consequence.
That is the pattern behind the ranking:
- Early projects: high error tolerance + broad basic skills.
- Middle projects: add layout, outdoor decisions, and external specifications.
- Later beginner projects: add structural and furniture geometry where errors are more visible or consequential.
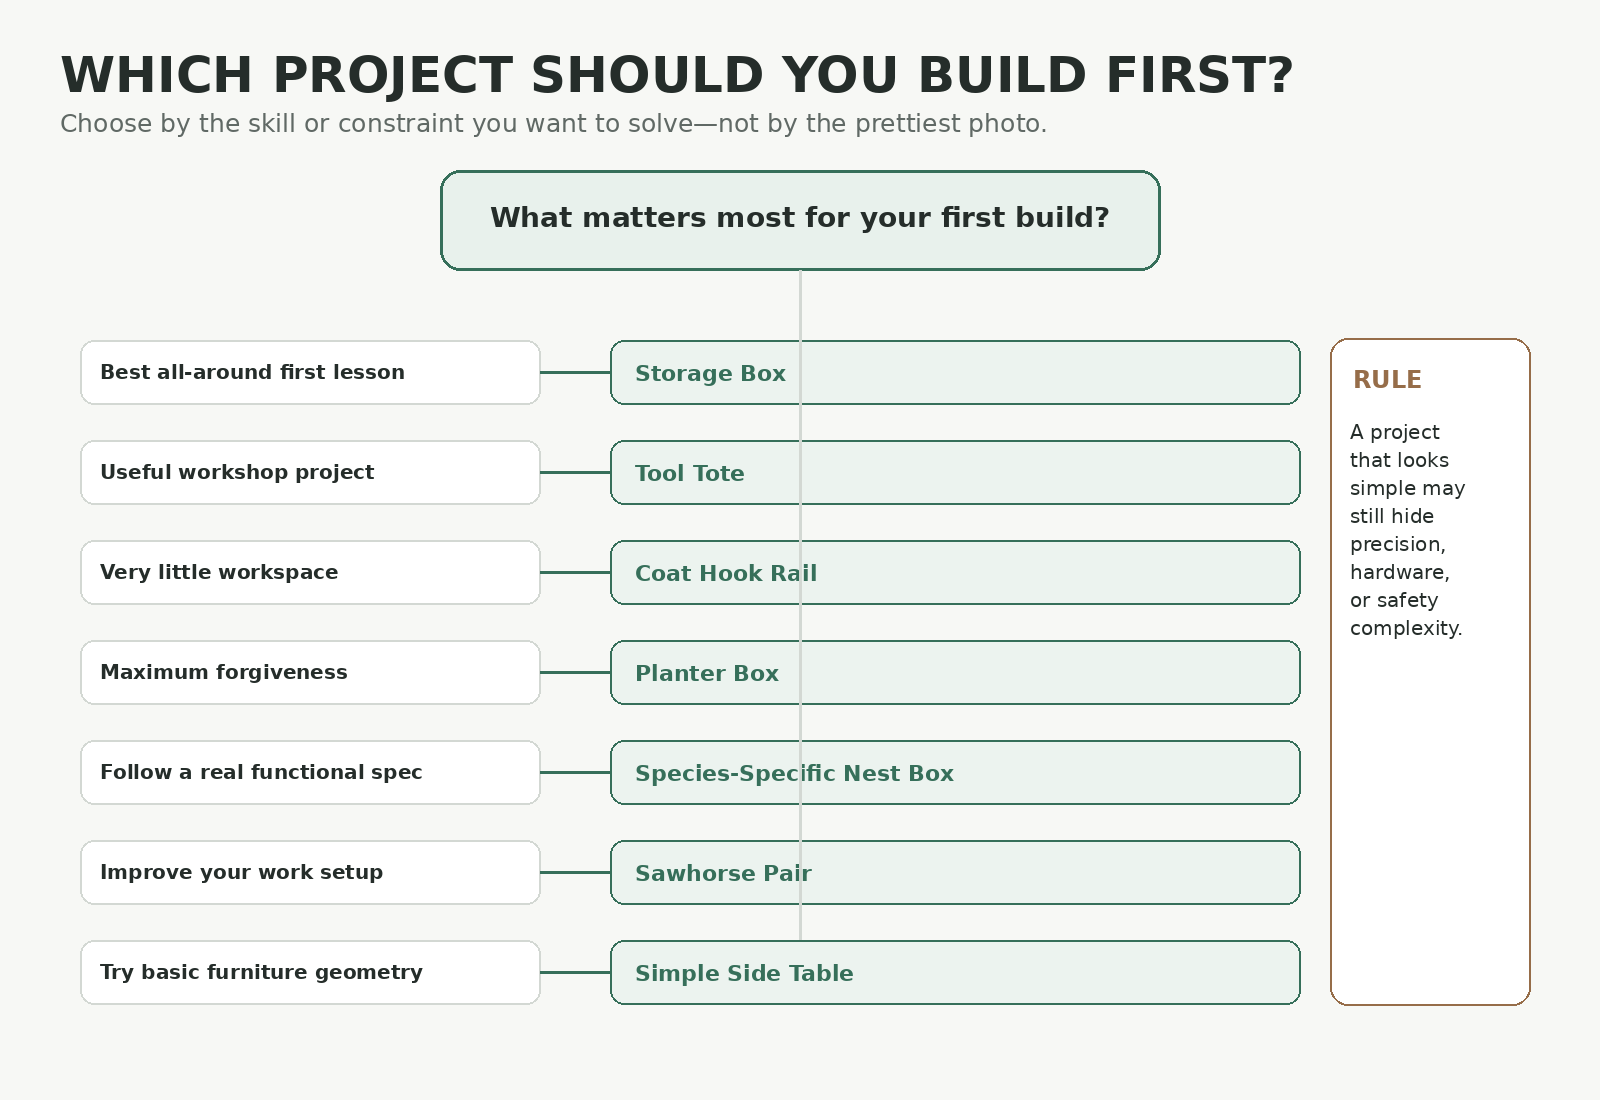
Which Project Should You Build First?
- You want the strongest all-around first lesson: build the Storage Box.
- You want something useful for your tools: build the Tool Tote.
- You have very little workspace: consider the Coat Hook Rail.
- You want maximum forgiveness: choose a rustic Planter Box.
- You want to follow a real functional specification: use a species-specific Nest Box plan.
- You want to improve your workspace: build a pair of Sawhorses.
- You are ready to try basic furniture geometry: build a Simple Side Table.
Projects That Look Easy but Often Are Not Great First Projects
| Project | Why It Looks Easy | Hidden Beginner Difficulty |
|---|---|---|
| Picture frame | Only four pieces | Miter errors accumulate and create highly visible corner gaps |
| Edge-grain cutting board | Simple rectangular slab | Material preparation, edge quality, glue-up, flattening, and finishing all matter |
| Floating shelf | Looks like one board on a wall | Hidden mounting can demand accurate drilling, wall assessment, and hardware alignment |
| Step stool | Small and few parts | Stability and structural failure have greater consequences because a person stands on it |
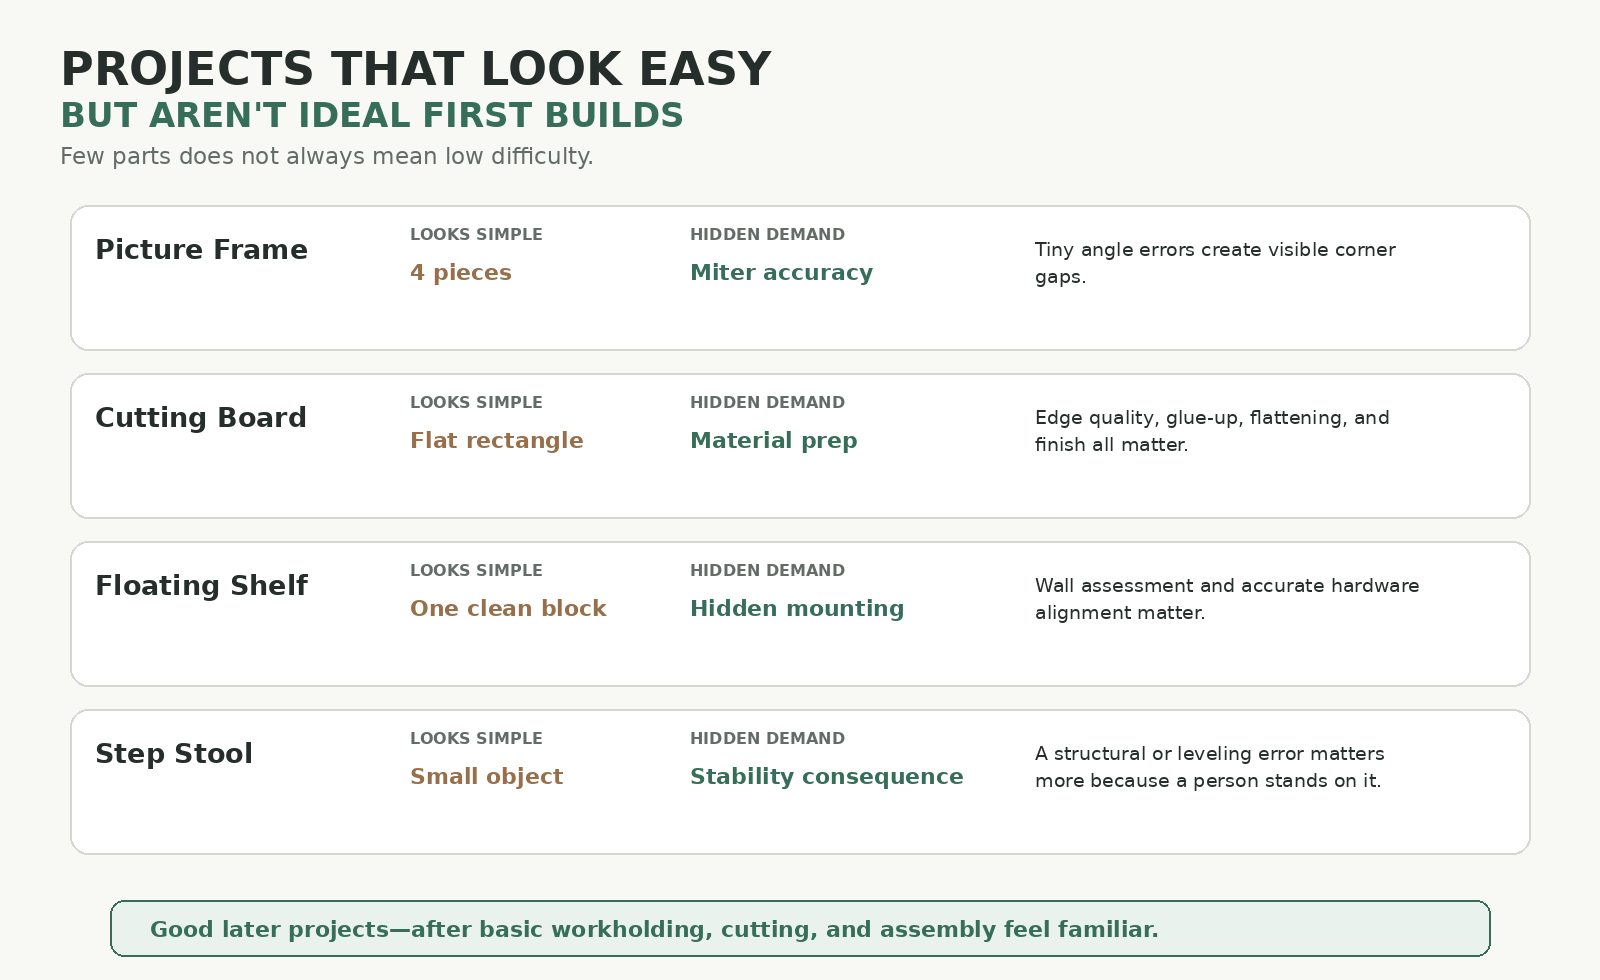
None of these are bad projects. They are simply better choices after you already understand your tools, workholding, and basic assembly.
Five Mistakes Beginners Make When Choosing a First Project
1. Choosing by appearance alone
A beautiful finished photo says almost nothing about the operations required to build it.
2. Counting parts instead of operations
Four miters may demand more precision than six square-cut parts.
3. Ignoring material preparation
A plan that begins with rough hardwood assumes a very different shop than one that begins with S4S dimensional lumber.
4. Ignoring the workspace
A project may use simple joints but still be difficult to manage if its pieces are too large for your available work area.
For workspace planning, see our one-car garage woodworking shop guide and small-space woodworking guide.
5. Buying a new tool before checking the project requirement
A project-specific tool can make sense, but first ask whether your existing saw, drill, guide, workholding, or a small accessory already provides the required capability.
That is the core idea behind our beginner tool buy-order guide.
How We Estimated Cost
KuduPost separates two numbers:
Checkout cost is what you may pay at the register when you need to buy full boards, packages of fasteners, glue, and other supplies.
Consumed-material cost estimates the portion that actually remains in one finished project.
That distinction matters. A box may use only a small fraction of a plywood project panel or screw package, while the leftover material can be used again.
For this article, current retail checks included examples such as:
- 1×6×4 select pine at about $9.04
- 1×8×4 select pine at about $10.69
- 1×4×4 select pine at about $5.52
- 1×8×8 #2 S4S whitewood at about $17.98
- 2×4×8 framing lumber around $3.98–$4.65
- 6-ft cedar fence pickets around $3.75–$4.28
- a representative three-pack of basic coat hooks around $10.98
These prices were checked on September 15, 2026 and are reference points, not guaranteed prices. Location, grade, species, availability, package size, promotion, and tax can all change the checkout total.
For complete beginner-shop budgets rather than project costs, see How Much Does It Cost to Start Woodworking?
How to Use This Ranking as a Skill Progression
You do not need to build all seven in order. But the sequence shows how woodworking complexity can grow without jumping directly into advanced joinery.
- Storage Box: matched parts + square assembly.
- Tool Tote: shaped parts + aligned handle.
- Coat Hook Rail: repeated layout + hardware positioning.
- Planter Box: repeated parts + outdoor decisions.
- Nest Box: external functional specification.
- Sawhorses: structural stability + larger stock.
- Side Table: furniture geometry + visible alignment.
By the end, you are no longer simply learning how to cut a board. You are learning how geometry, assembly sequence, material, hardware, and function interact.
Final Verdict
If you want one project to start with, KuduPost recommends the Simple Wooden Storage Box.
It is not the absolute cheapest object on this list, and it is not the project with the fewest parts.
It wins because it creates the best combination of:
- low tool burden
- high error tolerance
- low recovery cost
- useful finished object
- transferable measuring, cutting, drilling, fastening, clamping, and squaring skills
That is what a first woodworking project should do: give you enough challenge to learn something, without making every small mistake expensive or irreversible.
Research and Pricing Notes
- Cornell Lab of Ornithology / NestWatch species-specific guidance was used to avoid treating functional nest boxes as dimension-free decorative projects. See NestWatch’s construction-plan guidance.
- Representative lumber and hardware prices were checked on September 15, 2026 at major U.S. home centers and are used only for planning ranges.
- Price references included 1×6×4 select pine, 1×8×4 select pine, 1×4×4 select pine, representative 2×4×8 framing lumber, 6-ft cedar pickets, and a representative three-pack of coat hooks.
- Projects without a dedicated KuduPost plan are representative beginner concepts, not claims that KuduPost has physically built or tested those exact versions.
Editorial note: This article contains no affiliate links. Project costs are comparison data, not product recommendations.