A simple wooden box looks like the easiest woodworking project in the world.
It is also one of the fastest ways to discover whether your cuts are actually square.
If two opposite walls are different lengths, if one crosscut leans a little, or if the frame shifts while you tighten a clamp, the mistake shows up immediately: the box rocks, the corners open, or the bottom no longer fits.
That is exactly why a small storage box makes such a useful first woodworking project.
This KuduPost plan is designed around two beginner-friendly rules:
1. Build the walls from factory-width lumber so you do not need rip cuts.
2. Square the wall frame first, then fit the bottom to the box you actually built.
You do not need a table saw, router, pocket-hole jig, nail gun, dado blade, or advanced joinery.
The finished box is sized for sanding supplies, fastener containers, measuring tools, shop accessories, or general household storage.
Beginner Project Card
| Project | KuduPost Simple Wooden Storage Box |
|---|---|
| Difficulty | Beginner |
| Active build time | About 2.5–3.5 hours at a careful beginner pace |
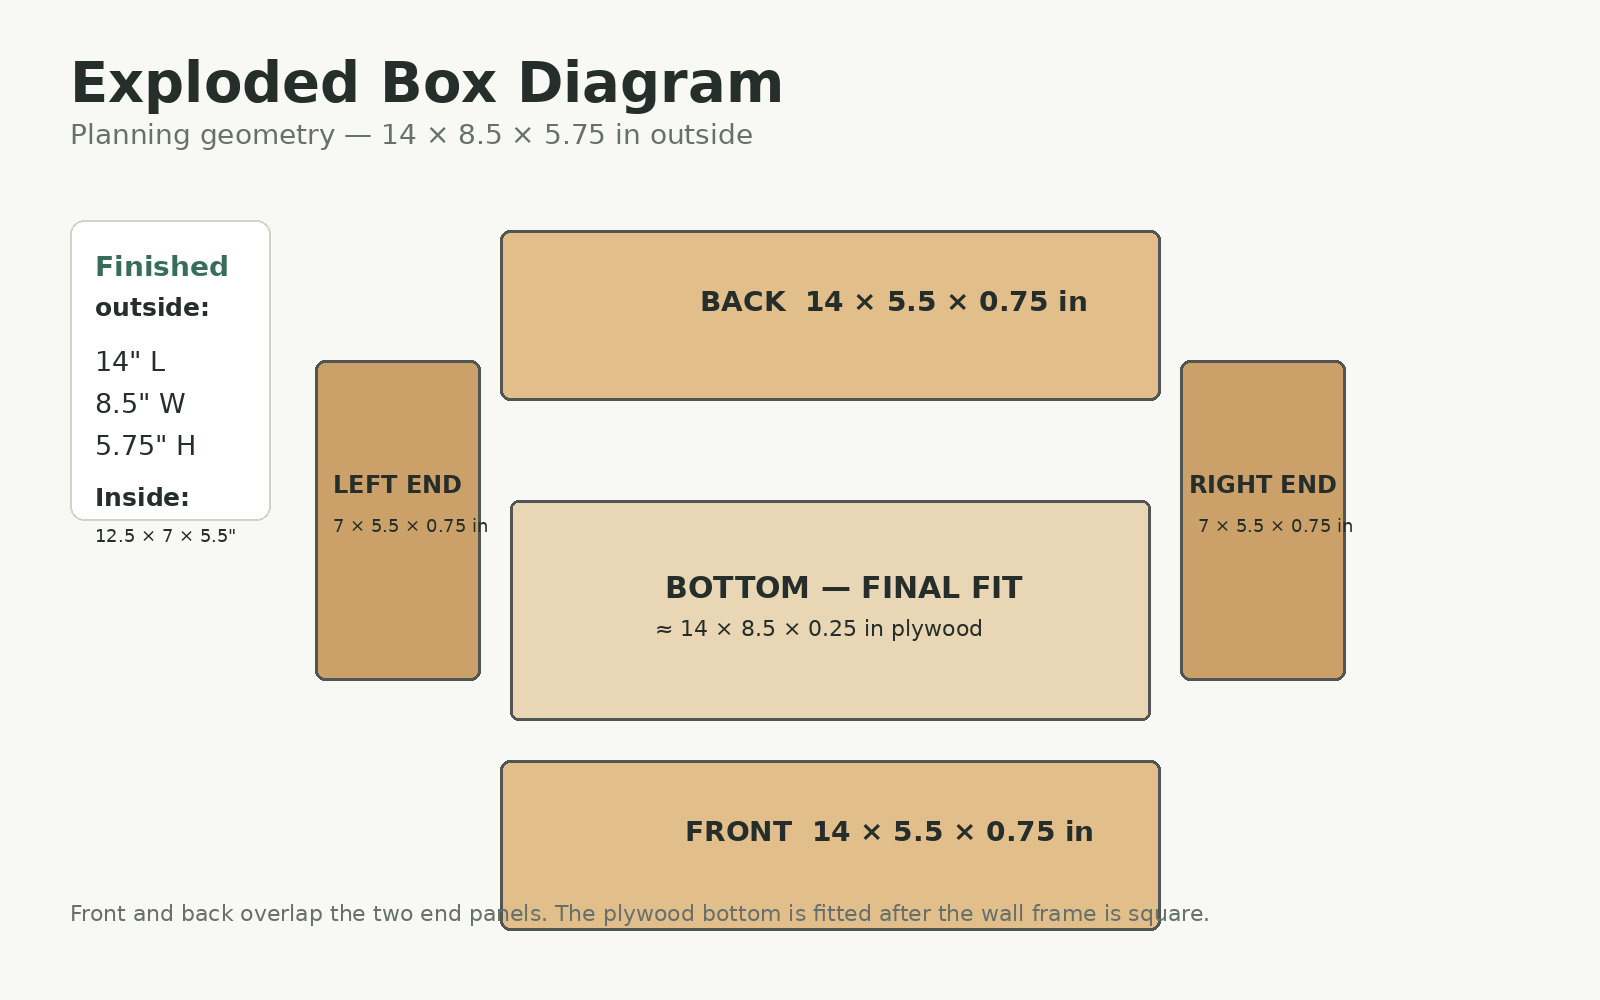
| Nominal outside size | 14 × 8.5 × 5.75 in |
| Nominal inside size | 12.5 × 7 × 5.5 in |
| Wall material | 1×6 pine |
| Bottom material | 1/4-in plywood |
| Table saw required? | No |
| Rip cuts required for the walls? | No |
| Primary skills | Crosscutting, paired-part layout, dry fitting, squaring, drilling, fastening, clamping, bottom fitting, sanding |
Why This Box Uses Pine Walls and a Plywood Bottom
The walls use common 1×6 lumber. A nominal 1×6 is typically around 3/4 in thick × 5-1/2 in wide, but confirm the actual dimensions of the boards you buy before cutting.
That factory width becomes the wall height, so the project does not require ripping a board lengthwise.
The bottom is different.
Instead of using a wide solid-wood board rigidly attached across the grain, this plan uses 1/4-in plywood. Plywood is dimensionally more stable across its face because its plies are laminated with alternating grain directions.
For a first project, that simplifies the build and avoids turning a basic storage box into a lesson about accommodating seasonal movement in a solid-wood bottom.
Materials
- 1 piece of 1×6 × 4 ft pine
- 1 piece of 1/4-in plywood large enough for a roughly 14 × 8.5 in bottom
- #8 × 1-5/8 in wood screws for the four corners
- PVA wood glue
- sandpaper suitable for the condition of your stock and chosen finish
Select pine is convenient because it is usually straighter and cleaner than lower-grade boards, but the project does not require a specific brand or grade. Inspect the board for twist, bow, cup, loose knots, or damaged edges before buying it.
Tools
Minimum Tool Path
- circular saw, jigsaw, or suitable handsaw
- drill/driver
- tape measure
- square
- clamps
- pencil
- sandpaper
Helpful but Optional
- miter saw for faster square crosscuts
- countersink bit
- random-orbit sander
- straightedge or saw guide
If you are still deciding which saw makes sense for beginner projects, see our circular saw vs. jigsaw vs. miter saw comparison.
Cut List
| Part | Qty. | Nominal Final Size | Material |
|---|---|---|---|
| Front | 1 | 14 × 5.5 × 0.75 in | 1×6 pine |
| Back | 1 | 14 × 5.5 × 0.75 in | 1×6 pine |
| Left end | 1 | 7 × 5.5 × 0.75 in | 1×6 pine |
| Right end | 1 | 7 × 5.5 × 0.75 in | 1×6 pine |
| Bottom | 1 | Approximately 14 × 8.5 × 0.25 in — final-fit after the wall frame is square | 1/4-in plywood |
Do not cut the plywood bottom to its final size yet.
The nominal drawing dimension is 14 × 8.5 in, but the final bottom should be fitted to the wall frame you actually assemble.
The Geometry in One Minute
The front and back overlap the ends.
Each end panel is 7 in long and sits between two 3/4-in-thick walls.
So the outside width is:
7 + 0.75 + 0.75 = 8.5 in
The outside length is simply the front/back length:
14 in
The inside length is:
14 − 0.75 − 0.75 = 12.5 in
The inside width is:
8.5 − 0.75 − 0.75 = 7 in
The wall height is 5.5 in. Because the 1/4-in plywood bottom sits underneath the walls, the total outside height is approximately:
5.5 + 0.25 = 5.75 in
No-Rip Wall Cutting Map
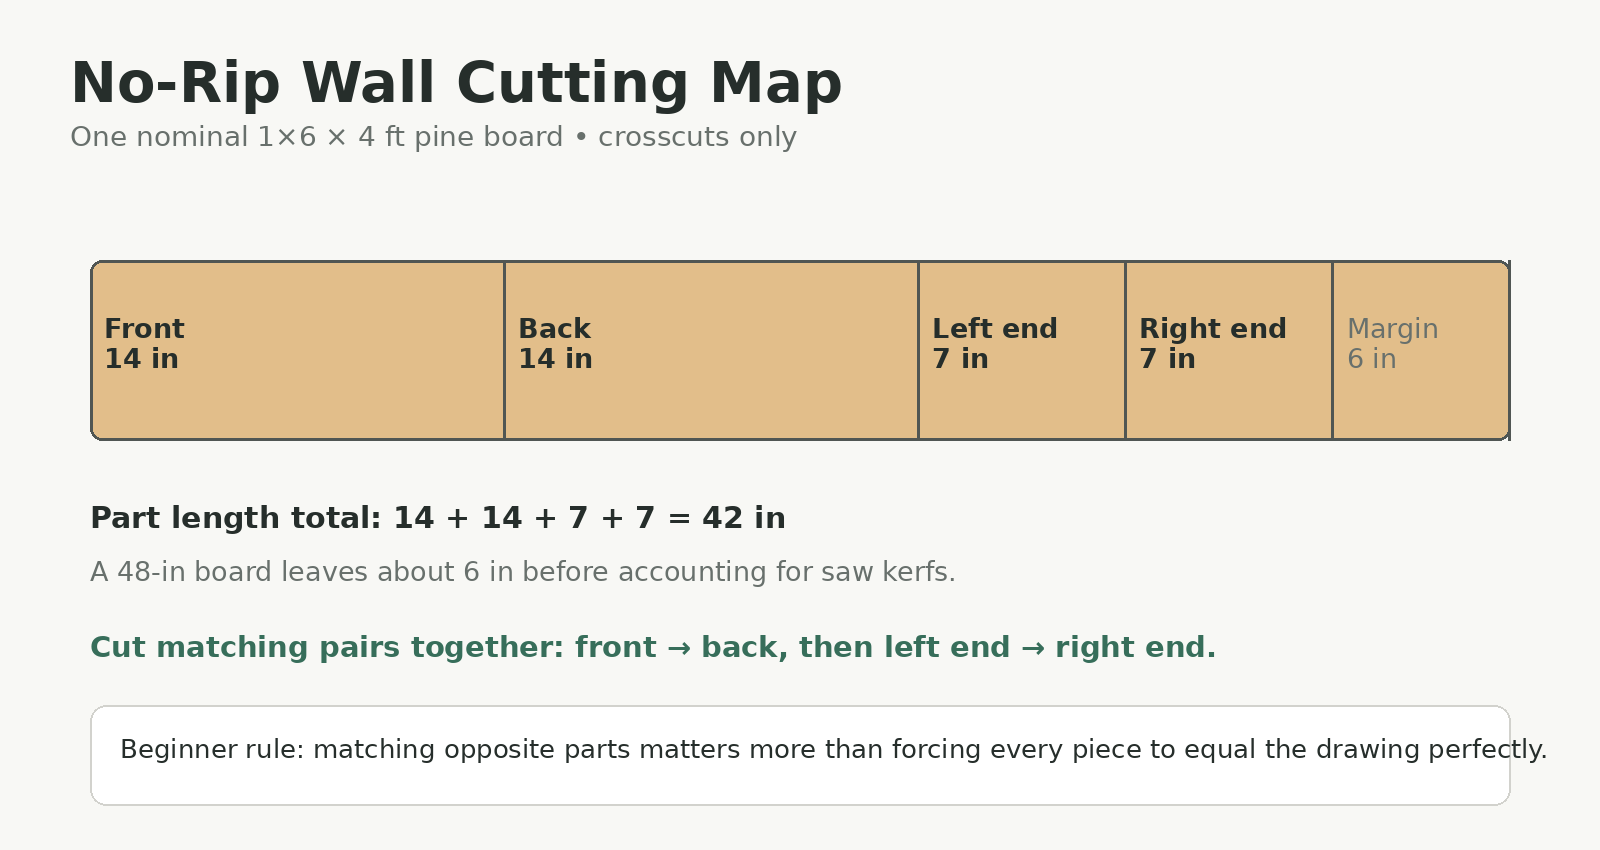
All four walls fit on one 48-in-long 1×6 board.
You need:
- 14 in — front
- 14 in — back
- 7 in — left end
- 7 in — right end
Total part length:
14 + 14 + 7 + 7 = 42 in
Even after allowing for normal saw kerfs, a 48-in board leaves useful margin for layout and small cutting errors.
This is one of the reasons the project works well for a first build: the board does not need to be ripped into custom widths, and the cut plan does not use every last fraction of an inch.
Step 1: Inspect and Mark the Board
Before cutting, lay the 1×6 on a reasonably flat surface.
Reject or work around major defects such as:
- severe twist
- deep cup
- loose knots at planned screw locations
- large splits near the ends
Mark the four parts.
Do not depend on four independent measurements if you can avoid it. Once the first 14-in piece is cut, use it as a physical reference while laying out its matching partner. Do the same with the first 7-in end.
The goal is not only to hit a number. The paired parts need to match each other.
Step 2: Cut the Front and Back
Cut the two 14-in parts.
Place them together and check that their ends align.
If one is slightly longer, correct the pair now rather than hoping the bottom will hide the mismatch later.
For a circular saw, support and secure the workpiece according to the saw manufacturer’s instructions. Keep the kerf from closing on the blade and do not defeat or tie back the lower guard.
OSHA’s portable-tool standard requires upper and lower guarding and automatic lower-guard return for portable circular saws in occupational use. In a home shop, the specific saw manual remains your primary operating reference.
Step 3: Cut the Two Ends
Cut two 7-in end panels.
Again, compare the pair directly.
A 6-15/16-in end and a 7-in end are more problematic together than two ends that both happen to measure 6-15/16 in.
That is an important beginner lesson:
Matching pairs often matter more than forcing every piece to equal the drawing perfectly.
Step 4: Pre-Sand the Inside Faces
Lightly sand the faces that will be harder to reach after assembly.
Do not aggressively round the mating edges.
A rounded butt-joint edge creates a visible groove even when the parts are otherwise aligned correctly.
There is no single grit sequence that is correct for every board and every finish. Start with the least aggressive abrasive that will efficiently remove the defects you actually have, then refine as needed for your chosen finish.
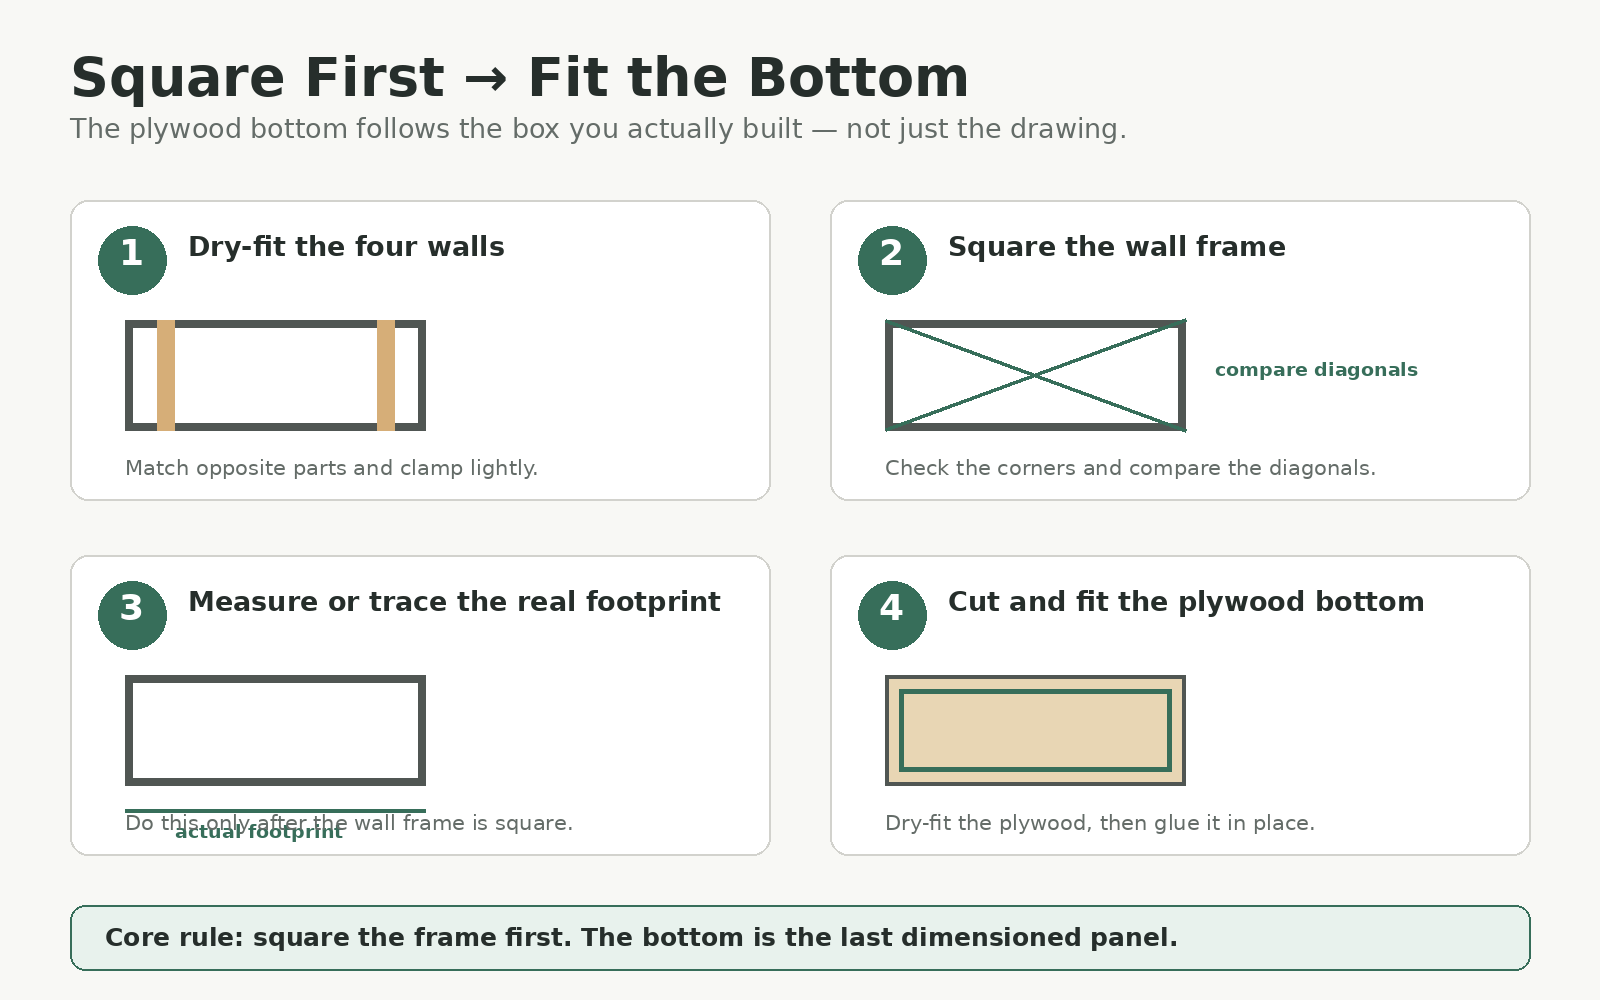
Step 5: Dry-Fit the Wall Frame
Arrange the front and back outside the two end panels.
The ends sit between the front and back.
Clamp the frame lightly without glue.
Check:
- front and back align at both ends
- both ends sit flush with the wall edges
- the frame rests flat
- all four corners close reasonably well
This is your opportunity to fix a mismatched part while nothing is permanent.
Step 6: Check the Frame for Square
A rectangular box can have four connected corners and still be racked into a parallelogram.
Use a reliable square at the corners and compare the two diagonals across the frame.
If the diagonals are equal, the rectangle is square within the accuracy of your measurement.
If they differ, nudge the frame until they match more closely.
Do this on a flat work surface.
Step 7: Glue and Screw the Corners
Take one joint apart at a time, apply a modest amount of PVA wood glue, return the pieces to position, and clamp.
This plan uses screws through the front/back pieces into the ends.
For the proposed 3/4-in stock, a #8 × 1-5/8 in screw passes through the first 3/4-in wall and provides approximately:
1.625 − 0.75 = 0.875 in
of penetration into the receiving piece.
That dimension is specific to this project geometry, not a universal screw rule.
Predrill according to the fastener manufacturer’s guidance and test on scrap when practical. Pilot-hole needs vary with screw geometry, wood species, and actual material condition.
Do not overdrive the heads into soft pine.
Step 8: Square Before the Glue Sets
Once all four corners are assembled, check the frame again.
Square first. Fit second.
This is the critical moment of the build.
The bottom will reinforce the geometry you give it. If you attach the bottom while the frame is racked, you can make the error much harder to correct.
Before moving on:
- check the corners
- compare diagonals
- confirm the frame rests flat
- make sure the walls are not twisted by excessive clamp pressure
Step 9: Fit the Bottom to the Real Box
Now ignore the theoretical 14 × 8.5-in bottom for a moment.
Place the squared wall frame on the plywood.
You can either carefully trace around the outside or measure the actual finished footprint and transfer those dimensions to the plywood.
Why wait until now?
Suppose your front and back finished at 13-15/16 in rather than exactly 14 in. Or your actual pine measures a few thousandths differently from the nominal 3/4-in expectation.
If you cut the bottom first, those small differences accumulate into an awkward mismatch.
If you fit the bottom after the wall frame is built, the bottom follows the real project.
This is the KuduPost Fit-the-Bottom Method.
Critical vs. Forgiving Dimensions
| Dimension or Relationship | Importance | Why |
|---|---|---|
| Front and back matching each other | Critical | Mismatched long walls make the frame difficult to square |
| Two ends matching each other | Critical | They control the box width |
| Crosscuts reasonably square | Critical | Angled ends create open corner joints |
| Wall frame square before bottom attachment | Critical | The bottom reinforces the existing shape |
| Front/back exactly 14.000 in | Forgiving | A small consistent variation simply changes the finished box length |
| Ends exactly 7.000 in | Forgiving within reason | Matching each other matters more than the theoretical target |
| Bottom exactly 14 × 8.5 in | Forgiving | It is final-fit to the actual frame |
| Cosmetic edge softening | Forgiving | It does not control structural geometry |
Step 10: Cut and Dry-Fit the Plywood Bottom
Cut the plywood along your transferred lines.
Dry-fit it against the bottom of the wall frame.
You want the edges close to flush, but do not force an oversized bottom into position by bending the walls.
If the plywood is slightly proud, refine the edge carefully.
If it is slightly undersized but still provides adequate contact with all four wall edges, the difference may be cosmetic rather than structural.
Step 11: Attach the Bottom
With the wall frame square and the bottom fitting correctly, apply glue to the bottom edges of the walls according to the adhesive manufacturer’s instructions.
Position the plywood and clamp or weight it evenly without distorting the frame.
For this light-duty box, the glued plywood bottom is the base design.
Small mechanical fasteners can be used as optional reinforcement if appropriate for your material and project use, but they are not required to understand or complete the core plan.
Step 12: Let the Assembly Cure
Do not rush the box into service because the glue feels dry on the surface.
Follow the adhesive manufacturer’s clamp and cure guidance.
After the glue has cured sufficiently, remove the clamps and check that the box rests flat.
Why Does My Wooden Box Rock?
If one corner lifts off a flat surface, do not immediately sand that corner shorter.
First identify the cause.
| Possible Cause | What to Check |
|---|---|
| Twisted or cupped stock | Lay individual walls on a flat reference surface |
| Opposite sides do not match | Compare paired parts directly |
| Crosscuts were not square | Check ends against a reliable square |
| Frame was racked during glue-up | Compare diagonals and inspect corners |
| Clamp pressure distorted the frame | Check whether the walls were pulled out of plane |
| Assembly surface was uneven | Move the box to a known flatter surface before diagnosing |
Sanding is a finishing tool, not a substitute for understanding the geometry problem.
Common Beginner Mistakes
| Problem | Likely Cause | Prevention | Possible Fix |
|---|---|---|---|
| Box is out of square | Frame shifted during clamping | Compare diagonals before bottom attachment | Correct while glue is still workable |
| Pine splits | Fastener driven near an edge without adequate pilot | Predrill and avoid overdriving | Replace badly split part; repair minor cosmetic split if appropriate |
| Bottom sticks out unevenly | Bottom cut before final frame geometry | Use Fit-the-Bottom | Refine proud edge after checking frame square |
| Visible corner gaps | Crosscuts not square or mating edges rounded | Check saw setup and preserve crisp joint edges | Correct the source rather than filling a large structural gap |
| Screw breaks through | Wrong length or bad angle | Verify joint geometry before fastening | Remove and reposition if the joint remains sound |
| Screw head is buried | Driver torque/pressure too high | Seat the head without crushing the pine | Fill minor cosmetic damage if needed |
| Glue stains the finish | Squeeze-out left on visible surfaces | Clean or remove according to adhesive instructions | Scrape/sand residue before finishing |
| Box rocks | Twist, racking, mismatched parts, or uneven reference surface | Inspect stock and square before bottom | Diagnose before sanding anything shorter |
Do You Need a Lid?
Not for the first version.
A hinged lid introduces a second level of geometry:
- overhang or flush fit
- hinge positioning
- screw length
- lid alignment
- movement and clearance
- hardware selection
Those are useful skills, but they distract from the lesson this project is trying to teach: how to build a square rectangular container.
Once this box is complete, a simple lift-off lid makes a better next upgrade than immediately adding hinges.
Do You Need to Finish the Box?
No.
An unfinished pine utility box works perfectly well in a shop.
If you want a finish, simple options include:
- paint
- a water-based clear finish
- another product appropriate to the intended use
Follow the finish manufacturer’s preparation, ventilation, application, cure, and disposal instructions.
Do not assume every stain, oil, or clear coat has the same ventilation or rag-disposal requirements.
How Much Does This Wooden Box Cost?
There are two different numbers worth understanding:
Checkout cost: what you pay if you must buy every package from scratch.
Consumed-material cost: the approximate value of the lumber, plywood, screws, glue, and abrasive actually used in one box.
Using representative U.S. home-center pricing checked for this project, a beginner starting with no materials may spend roughly $32–$38 before tax and optional finish, depending on retailer, location, package sizes, and lumber grade.
The amount consumed by one box is much lower because most of the plywood panel, screw package, glue bottle, and abrasive remain available for future projects.
A reasonable consumed-material estimate is roughly $11–$14.
Those numbers are planning estimates, not promises about local retail pricing.
For a broader beginner budget framework, see How Much Does It Cost to Start Woodworking?
Can You Build This Without a Garage?
Yes.
The project is small enough to build on a stable portable work surface with proper workholding.
If you are working in a shared garage, see our one-car garage woodworking shop layout guide.
If you do not have a garage, our small-space woodworking guide covers portable and temporary setups.
How This Project Differs From the Wooden Tool Tote
The KuduPost Wooden Tool Tote teaches a portable handled build with shaped end panels and a Stop-and-Measure sequence.
This box teaches a different set of fundamentals:
- matching opposite parts
- keeping a four-sided frame square
- understanding inside vs. outside dimensions
- fitting a plywood bottom to real geometry
- locking in a square shape
That makes the two projects complementary rather than repetitive.
Final Plan Summary
Outside size: approximately 14 × 8.5 × 5.75 in
Inside size: approximately 12.5 × 7 × 5.5 in
Walls: 1×6 pine
Bottom: 1/4-in plywood, final-fit after assembly
Joinery: glued and screwed butt joints at the corners; glued plywood bottom
Rip cuts: none for the wall frame
Advanced machines: none required
Active build time: roughly 2.5–3.5 hours for a careful beginner
Core KuduPost rule: Square first. Fit second.
If you learn only one thing from this project, make it this:
A woodworking plan gives you target dimensions. The assembly in front of you tells you what the next part actually needs to be.
Technical and Safety Notes
- Confirm the actual dimensions of your lumber before relying on nominal-size math.
- Pilot-hole requirements depend on the fastener, wood species, and material condition. Follow fastener guidance and test on scrap when practical.
- Portable circular saws should be operated with their guards working correctly. OSHA 29 CFR 1910.243 describes upper/lower guarding and automatic lower-guard return in occupational settings.
- For saws, drills, and other tools, follow the manufacturer’s operating and workholding instructions.
- Follow adhesive and finish instructions for clamp time, cure time, ventilation, cleanup, and disposal.
Editorial note: This article contains no affiliate links. KuduPost receives no commission from products or retailers referenced for material-cost context, and the project was developed for editorial and educational use rather than commercial promotion.