A wooden tool tote is a good first woodworking project for one simple reason: it teaches real shop skills without requiring a shop full of machines.
This KuduPost plan is designed around a beginner constraint that many “easy” plans quietly ignore:
You should be able to build it without a table saw, router, planer, pocket-hole jig, or nail gun.
The long edges come directly from common dimensional lumber. You only need crosscuts, two simple angled cuts on each end panel, drilled handle holes, glue, screws, and sanding.
Even better, the build uses a Stop-and-Measure step before the side panels and handle are cut. If your first cuts are slightly short, you can adapt the remaining pieces instead of throwing the project away.
Beginner Project Card
| Project | KuduPost Wooden Tool Tote |
|---|---|
| Difficulty | Beginner |
| Active build time | About 2.5–3 hours for a careful first build |
| Elapsed time | Longer if glue/finish cure time is included |
| Nominal overall size | 17.5 × 8.75 × 11 in |
| Minimum power tools | One saw + drill/driver |
| Table saw required? | No |
| Rip cuts required? | No |
| Main skills learned | Crosscutting, layout, drilling, pilot holes, glue-up, fastening, checking square, sanding |
This is a light-duty utility tote for hand tools and small shop items. It is not load-rated, so do not treat it as a container for unusually heavy equipment.
The KuduPost No-Rip Design
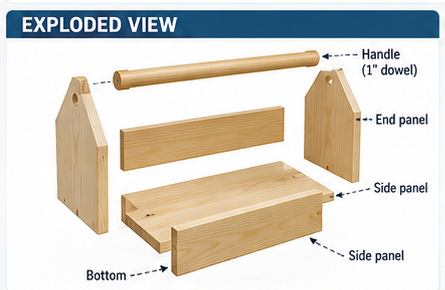
The tote is built from common nominal boards whose factory widths become finished project dimensions:
- 1×8 pine — typically about 3/4 in thick × 7-1/4 in wide
- 1×4 pine — typically about 3/4 in thick × 3-1/2 in wide
- 1 in hardwood dowel — handle
Because those widths are already usable, a beginner does not need to rip a board lengthwise.
That eliminates one of the most common hidden requirements in beginner woodworking plans.
Materials
- 1 piece of 1×8 × 4 ft pine
- 1 piece of 1×4 × 4 ft pine
- 1 in diameter hardwood dowel, at least 18 in long
- #8 × 1-5/8 in wood screws, approximately 14
- PVA wood glue
- sandpaper appropriate to the condition of your lumber and chosen finish
Select pine is convenient because it is usually straighter and has fewer knots than lower-cost common boards, but it is not mandatory. Inspect any board before buying it. Avoid pieces with severe twist, bow, loose knots, or damage near the areas you need to cut.
Tools
Must Have
- circular saw, jigsaw, miter saw, or handsaw suitable for the cuts
- drill/driver
- 1 in spade bit or Forstner bit
- pilot-hole bit appropriate to your selected screws and wood
- tape measure
- square
- clamps
- sandpaper
Helpful
- countersink bit
- random-orbit sander
- two 12 in or longer bar clamps
- straight scrap board for a circular-saw guide
Optional
- miter saw
- table saw
- brad nailer
None of the optional tools is required for this plan.
If you are still deciding which saw makes sense for your first projects, see our circular saw vs. jigsaw vs. miter saw beginner guide.
Cut List
| Part | Qty. | Final Size | Stock |
|---|---|---|---|
| Bottom | 1 | 16 × 7-1/4 × 3/4 in | 1×8 |
| End panels | 2 | 11 × 7-1/4 × 3/4 in | 1×8 |
| Side panels | 2 | Nominally 17-1/2 × 3-1/2 × 3/4 in | 1×4 |
| Handle | 1 | Nominally 17-1/2 in long × 1 in diameter | Hardwood dowel |
Important: do not cut the side panels or handle to 17-1/2 in yet. That is the design dimension. We will measure the actual bottom-and-end assembly first, then cut those three parts to match.
Why the Geometry Works
The bottom is 16 in long. Each end panel is 3/4 in thick and sits outside the bottom.
Nominal overall length:
16 + 0.75 + 0.75 = 17.5 in
The bottom and end panels are 7-1/4 in wide. The two 3/4 in-thick side panels overlap their outside edges.
Nominal overall width:
7.25 + 0.75 + 0.75 = 8.75 in
The side panels are 3-1/2 in high and their bottom edges sit flush with the underside of the tote.
That creates approximately:
3.5 − 0.75 = 2.75 in
of inside side-wall height above the tote floor.
Board Cutting Map
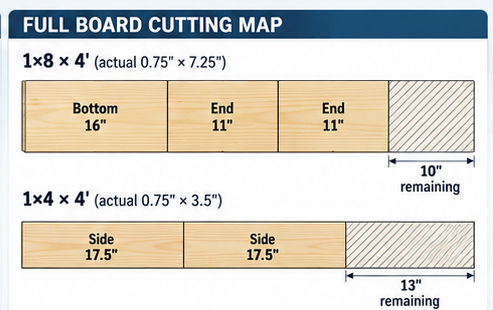
The plan fits comfortably into two 4 ft boards.
1×8 × 48 in Board
Cut:
- 16 in — bottom
- 11 in — end panel
- 11 in — end panel
Total before saw kerfs:
16 + 11 + 11 = 38 in
That leaves about 10 in before accounting for kerf, which gives a beginner useful margin.
1×4 × 48 in Board
Nominal plan:
- about 17-1/2 in — side
- about 17-1/2 in — side
But these pieces are deliberately cut after the first assembly is measured.
Handle
Cut the dowel to the same measured outside length as the side panels.
Step 1: Cut the Bottom and End Panels
Start with the 1×8.
Cut:
- one 16 in bottom
- two 11 in end panels
Do not cut the sides yet.
If using a circular saw, support and secure the workpiece according to your saw manufacturer’s instructions. Keep the work stable and arrange the support so the kerf does not close onto the blade during the cut.
Do not defeat or tie back the saw’s lower blade guard. OSHA’s portable-tool standard describes upper and lower guards for portable circular saws and requires the lower guard to return automatically when the saw leaves the work. For a home shop, your saw manufacturer’s instructions remain the primary operating guide.
Step 2: Mark the End-Panel Shape
Each end panel begins as an 11 × 7-1/4 in rectangle.
On the top-left corner:
- measure 2 in down the side
- measure 2 in inward along the top
- connect the two marks
Repeat on the top-right corner.
This removes a 2 × 2 in triangular corner on each side and leaves a 3-1/4 in-wide flat section across the top.
Cut the two diagonal lines with a jigsaw or handsaw.
Use the first finished end panel as a visual template for the second so the pair matches.
Step 3: Mark and Drill the Handle Holes
The handle-hole center is:
- 3-5/8 in from either side — the center of a 7-1/4 in board
- 1-1/2 in down from the top edge
Mark both end panels carefully.
Clamp each panel over scrap wood before drilling. The scrap supports the fibers where the bit exits and helps reduce tear-out.
If using a spade bit, another beginner-friendly technique is to drill until the bit’s center point just appears through the back, then flip the work and complete the hole from the other side.
Keep hands clear of the bit and clamp the work rather than trying to hold it by hand.
Step 4: Pre-Sand the Hard-to-Reach Faces
Lightly sand:
- the inside faces of both end panels
- the top face of the bottom
- the inside faces of the future side panels before installation
Do not aggressively round the mating edges. Rounded joint edges make simple butt joints look less precise.
There is no universal grit sequence for every board and finish. Start with an abrasive coarse enough to remove machining marks or defects without unnecessarily removing material, then refine the surface as appropriate for your chosen finish.
Step 5: Assemble the Bottom Between the End Panels
Stand the two end panels outside the ends of the 16 in bottom panel.
The bottom edges of all three pieces should sit flush on a flat work surface.
Dry-fit the assembly before applying glue.
When everything aligns:
- apply a modest amount of wood glue to the mating surfaces
- clamp the pieces in place
- predrill according to the screw manufacturer’s guidance and your scrap test
- drive two screws through each end panel into the bottom
Do not use the drill/driver clutch setting as an excuse to bury the screw head deep into soft pine. Stop when the head is seated.
Step 6: Stop and Measure
This is the most important beginner-friendly step in the plan.
Do not assume the assembly is exactly 17-1/2 in long just because the drawing says so.
Measure the actual distance from the outside face of one end panel to the outside face of the other.
If your bottom was cut perfectly, the measurement should be close to:
16 + 0.75 + 0.75 = 17.5 in
But suppose your first cut ended up at 15-7/8 in.
Your new outside length would be approximately:
15.875 + 0.75 + 0.75 = 17.375 in
Instead of restarting the project, cut both side panels and the handle to 17-3/8 in.
This is the KuduPost Stop-and-Measure rule: let the parts you already built determine the final trim dimensions.
Step 7: Cut the Side Panels and Handle
Transfer your measured outside length to the 1×4 board.
Cut two side panels to the same length.
Then cut the 1 in dowel to that same measured length.
Before moving on, place the two side panels together and check that their ends align. Matching sides matter more than hitting a theoretical number perfectly.
Critical vs. Forgiving Dimensions
| Dimension | How Important? | Why |
|---|---|---|
| Two end-panel heights | Critical | Mismatched ends make the handle and top profile look crooked |
| Two handle-hole centers | Critical | Misaligned holes make the dowel difficult or impossible to install straight |
| Two side-panel lengths | Critical | The finished tote will look twisted or uneven if the sides differ |
| Exact 16 in bottom length | Forgiving | Small error can be absorbed by Stop-and-Measure |
| Exact dog-ear angle | Forgiving | The visual match between the two ends matters more than a mathematical angle |
| Final overall length | Forgiving | A tote slightly shorter or longer still functions if matching parts are cut consistently |
Step 8: Dry-Fit the Side Panels
Place one side panel against each long edge of the tote.
The side-panel bottom edges should be flush with the underside of the bottom and the panel ends should align with the outside faces of the end panels.
Clamp the sides in place.
Check:
- both sides are flush at the ends
- the tote sits flat
- the end panels remain upright
- the assembly has not racked into a parallelogram
Use a reliable square and/or compare diagonal measurements across the rectangular lower assembly. Matching diagonals are a useful check that a rectangle is square.
Step 9: Glue and Screw the Side Panels
Remove one side at a time so the dry-fit relationship is not lost.
Apply glue where the side meets:
- the bottom edge
- the two end-panel edges
Clamp the panel back in place.
Predrill before driving screws into the narrow board edges.
A practical layout is four screws per side:
- one into the edge of each end panel
- two spaced along the edge of the bottom
These locations are part of this project design, not a universal screw-spacing rule. Center the fasteners on the receiving board edges and keep them comfortably clear of the board ends.
Repeat on the opposite side.
Wipe away accessible glue squeeze-out before it hardens, following the glue manufacturer’s instructions.
Step 10: Install the Handle
Slide the dowel through the first end panel and continue until it enters the second handle hole.
Center it so both ends finish flush with the outside faces.
If the dowel is too tight to insert by hand, do not hammer aggressively against the end panel. Check for:
- tear-out inside the hole
- slight hole misalignment
- a dowel that measures slightly larger than nominal
Correct the cause rather than forcing the assembly.
Once the handle fits, apply glue according to your chosen PVA glue’s instructions.
For mechanical retention in this plan, predrill down through the flat top of each end panel into the dowel and install one screw at each end. Predrilling is especially important here because the remaining wood around the handle hole is relatively narrow.
Step 11: Final Square Check
Before the glue sets:
- place the tote on a flat surface
- check that it does not rock
- verify the two sides remain parallel
- check the lower rectangular assembly for square
- confirm the handle is centered and not twisting the end panels
Square Before the Glue Sets
It is much easier to correct a small rack while clamps can still move than after the glue has cured.

Step 12: Final Sanding
After the glue has cured for the time specified by its manufacturer:
- remove hardened squeeze-out carefully
- flush minor mismatches without aggressively rounding corners
- soften only the edges that feel uncomfortable in the hand
- smooth the dowel handle
Keep the project functional. A utility tote does not need furniture-grade surface preparation unless you want it.
Do You Need to Finish It?
No.
An unfinished pine tote is completely usable and will naturally pick up dents, stains, and shop wear.
If you want a finish, a beginner-friendly choice is a simple water-based product used according to the manufacturer’s surface-preparation, ventilation, application, and cure instructions.
Paint is another forgiving option if appearance matters more than showing the wood grain.
If you choose an oil-based or oil-curing product, follow the label and Safety Data Sheet carefully, including all instructions for handling application rags. Oil-contaminated rags can present a self-heating/fire hazard when stored improperly.
Common Beginner Mistakes
| Problem | Likely Cause | Prevention |
|---|---|---|
| Split pine | Fastener driven without adequate pilot hole, especially near ends/edges | Predrill, use a scrap test, avoid overdriving |
| Tote rocks | Parts assembled on an uneven surface or bottom/end cuts not square | Assemble on a flat surface and dry-fit first |
| Handle will not slide through | Hole centers differ or tear-out narrows a hole | Mark from the same references and drill with backing |
| Side ends do not align | Sides cut before the first assembly was measured | Use Stop-and-Measure |
| Visible gaps at joints | Mating edges were rounded during pre-sanding | Keep joint edges crisp until assembly |
| Screw heads sink too deeply | Driver torque too high or excessive pressure | Seat the screw; do not bury it in soft pine |
How Much Does This Tool Tote Cost?
The useful number depends on whether you mean checkout cost or material consumed by one tote.
A beginner buying every package new may need to purchase:
- a full 4 ft 1×8
- a full 4 ft 1×4
- a longer dowel than the project needs
- a box of screws
- a bottle of glue
Using representative major-retailer prices checked in September 2026, purchasing all of those items new can land around $40 before sales tax, depending on location, lumber grade, screw package size, and retailer.
The amount physically consumed by the project is lower because the build leaves spare lumber, dowel, screws, and glue for another project.
That is why we do not describe the entire package price as the “cost of the tote.”
If you already own screws, glue, or scrap stock, the marginal project cost can fall substantially.
For a broader explanation of beginner-tool and material budgeting, see How Much Does It Cost to Start Woodworking?
Can You Build This in a Small Space?
Yes. This project does not require a permanent workbench or stationary machine.
A stable portable work surface with appropriate workholding is enough for most of the operations.
If your shop is a shared one-car garage, our one-car garage woodworking shop guide explains how to keep work surfaces and tools mobile.
If you do not have a garage at all, see how to start woodworking in a small space.
Why This Is a Good First Woodworking Project
This tote is intentionally simple, but it is not a throwaway practice exercise.
It teaches:
- how nominal lumber dimensions affect a plan
- how to make repeatable crosscuts
- how to transfer matching layout marks
- how to drill clean holes through solid wood
- how to predrill for screws
- how glue and mechanical fasteners work together
- how to dry-fit before committing
- how to check an assembly for square
- how to recover from small cutting errors
The most valuable lesson may be the Stop-and-Measure step.
Woodworking plans contain dimensions, but real pieces are not mathematical abstractions. Saw kerfs, board thickness, layout mistakes, and measurement variation all exist.
A beginner who learns to measure the assembly in front of them — rather than blindly forcing it to match a drawing — has already learned an important woodworking habit.
Final Plan Summary
Nominal finished size: 17.5 × 8.75 × 11 in
Core stock: one 1×8 × 4 ft, one 1×4 × 4 ft, one 1 in hardwood dowel
Joinery: glued and screwed butt joints
Advanced machines required: none
Rip cuts: none
Active beginner build time: approximately 2.5–3 hours
Best beginner rule: cut the bottom and ends first, assemble them, then measure before cutting the sides and handle.
You do not need a complete workshop to build a useful woodworking project.
You need a plan that is honest about the tools, dimensions, and mistakes a beginner is actually likely to encounter.
Technical and Safety Notes
- Nominal 1× lumber dimensions vary by product and moisture/production conditions. Confirm the actual dimensions of the boards you buy before relying on the plan math.
- Pilot-hole size depends on fastener geometry, wood species, and manufacturer guidance. Test on scrap rather than treating one drill-bit diameter as universal.
- Portable circular saws should be used with their guards operating correctly. OSHA 29 CFR 1910.243 describes upper/lower blade guarding and automatic lower-guard return in occupational settings.
- For any saw or drill, follow the tool manufacturer’s operating and workholding instructions.
- Follow glue and finish manufacturer instructions for ventilation, curing, cleanup, and disposal.
Editorial note: This article contains no affiliate links. KuduPost receives no commission from products or retailers mentioned for material-cost context, and the plan was developed for editorial and educational use rather than commercial promotion.