You do not need a two-car garage to start woodworking.
What you do need is a setup that matches the space you actually have.
For one beginner, that might mean a folding bench and a few hand tools in a spare room. For another, it could be a circular saw and portable workbench that come out only when the patio is available. Someone with a driveway may be able to use tools that would make no sense inside an apartment.
The mistake is trying to shrink a full-size woodshop into a space that was never designed for one.
A better approach is to build your woodworking setup around four constraints: space, dust, noise, and storage.
Get those right, and surprisingly useful woodworking becomes possible without a dedicated garage.
Quick Answer: Can You Really Do Woodworking Without a Garage?
Yes, but your tool choices and projects need to fit your space.
For most beginners, we would break small-space woodworking into four practical setups:
| Setup | Best For | Tool Direction | Biggest Constraint |
|---|---|---|---|
| Indoor / Apartment | Small projects and hand-tool work | Hand tools + drill | Dust and neighbors |
| Balcony / Patio | Portable woodworking | Compact power tools + hand tools | Weather and noise |
| Driveway / Pack-Away | Larger temporary setups | Circular saw, portable tools | Setup and teardown |
| Small Shed | Semi-permanent workshop | Mixed power and hand tools | Space and ventilation |
There is no single “small workshop” that works for everyone.
Your first job is to choose the model that fits your living situation.
1. The Indoor Hand-Tool Setup
If you live in an apartment, condo, or house with no outdoor workspace, hand tools deserve serious consideration.
Not because they are old-fashioned.
Because they change the logistics of woodworking.
A small collection might include:
- Japanese pull saw or Western handsaw
- combination square
- chisels
- block plane
- cordless drill/driver
- clamps
- sharpening equipment
- a bench hook
- portable workholding
That is enough to build small boxes, shelves, organizers, stools, tool totes, frames, and many other beginner projects.
Why hand tools can make sense indoors
A hand plane removes material as shavings.
A handsaw generally creates coarser sawdust than high-speed sanding or routing operations.
And most hand tools occupy very little storage space compared with stationary machinery.
That does not mean hand-tool woodworking is dust-free, silent, or automatically safer.
Sawing still produces dust. Sanding still produces dust. Chisel and mallet work can transmit impact noise through a building.
But an indoor hand-tool setup can avoid some of the biggest problems created by high-speed power tools.
The tradeoff
Hand tools move the work from the motor to you.
Preparing a large quantity of lumber by hand can be slow and physically demanding. Flattening boards, ripping long stock, and dimensioning rough lumber require skill and good workholding.
For that reason, an apartment beginner may get better results by buying lumber that is already reasonably close to final dimensions.
The goal is not to recreate a traditional hand-tool shop.
It is to eliminate unnecessary material preparation.
2. The Balcony or Patio Setup
Access to even a small outdoor area changes what is practical.
A balcony or patio may allow tools such as:
- cordless drill/driver
- jigsaw
- compact circular saw
- random-orbit sander with dust extraction
- portable workbench
- sawhorses
But outdoor access does not remove the problems of dust and noise.
It simply changes where they occur.
Before using power tools on a balcony or shared patio, check your lease, building rules, HOA or condo rules, and local noise requirements. These rules vary significantly by property and location, so there is no universal “safe woodworking time.”
The important balcony limitation
Your dust does not disappear because you are outside.
It may end up on:
- neighboring balconies
- windows
- vehicles
- outdoor furniture
- common areas
That makes source collection and cleanup important even outdoors.
A small shop vacuum connected to compatible tools can be far more useful than simply sweeping the area afterward.
3. The Driveway or Pack-Away Workshop
If you have access to a driveway, yard, or other temporary outdoor space, you can build a surprisingly capable workshop without dedicating permanent floor space to it.
This is where portable power tools begin to make much more sense.
A typical pack-away setup could revolve around:
Portable workbench + circular saw + drill/driver + clamps + shop vacuum.
Add a jigsaw when your projects require curves.
Add a miter saw when repeated crosscuts begin consuming too much time.
This is also where the circular saw becomes particularly useful.
Unlike a stationary saw, it goes to the workpiece.
That means a large panel can stay supported while you move the relatively small saw through it.
We covered this decision in more detail in our comparison of circular saws, jigsaws, and miter saws.
The hidden problem: setup friction
A temporary workshop fails when it takes longer to assemble the workshop than to make the project.
If every woodworking session requires twenty minutes of searching for clamps, extension cords, blades, screws, and measuring tools, you will use the shop less.
A better system is to store tools by workflow.
- Keep cutting accessories together.
- Keep measuring and marking tools together.
- Keep drilling bits and fasteners together.
- Keep sanding supplies together.
The objective should be:
open → work → clean → pack away.
Not rebuilding the workshop from scratch every weekend.
4. The Small Shed Setup
A shed sits between a temporary workspace and a real dedicated shop.
Even a compact shed can provide something apartments and patios cannot:
permanent tool storage.
That matters more than beginners often realize.
You no longer need to carry every tool through the house before starting.
A small shed can support:
- compact workbench
- wall storage
- circular saw
- jigsaw
- miter saw
- drill/driver
- portable vacuum
- hand tools
- clamps
But a shed should not automatically be treated like a full-size garage workshop.
Ventilation, electrical capacity, tool clearances, fire safety, and dust collection still need to be considered.
A tiny room filled with increasingly large machines is not an efficient shop.
It is just a crowded one.
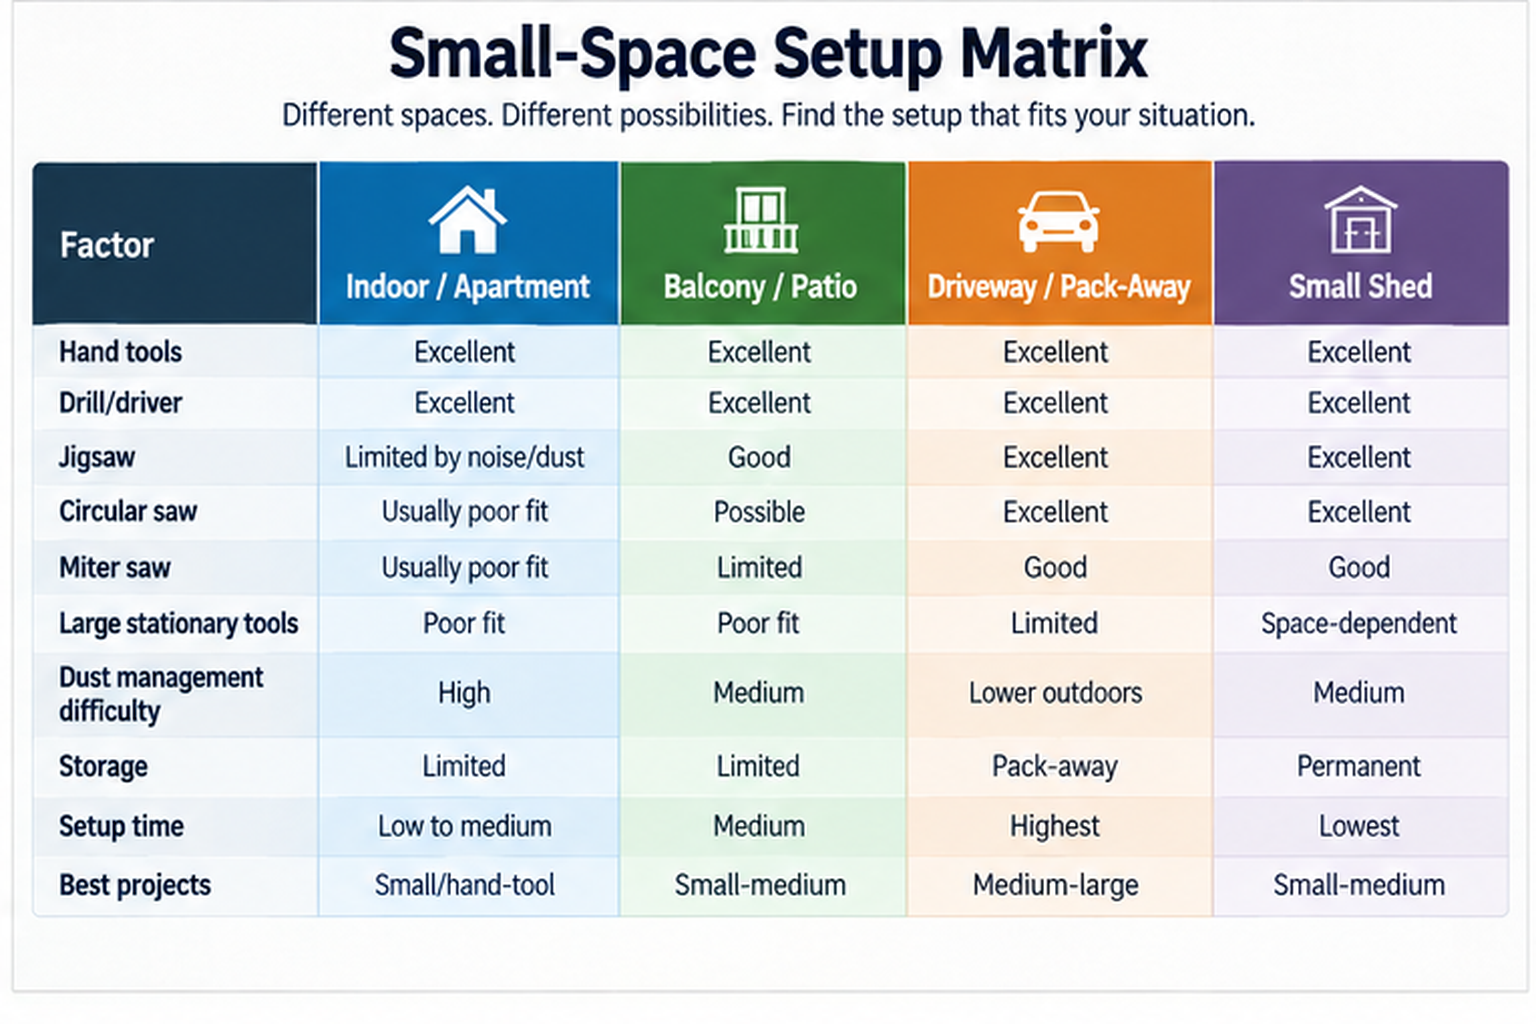
The KuduPost Small-Space Setup Matrix
| Factor | Indoor / Apartment | Balcony / Patio | Driveway / Pack-Away | Small Shed |
|---|---|---|---|---|
| Hand tools | Excellent | Excellent | Excellent | Excellent |
| Drill/driver | Excellent | Excellent | Excellent | Excellent |
| Jigsaw | Limited by noise/dust | Good | Excellent | Excellent |
| Circular saw | Usually poor fit indoors | Possible | Excellent | Excellent |
| Miter saw | Usually poor fit | Limited | Good | Good |
| Large stationary tools | Poor fit | Poor fit | Limited | Space-dependent |
| Dust management difficulty | High | Medium | Lower outdoors | Medium |
| Storage | Limited | Limited | Pack-away | Permanent |
| Setup time | Low to medium | Medium | Highest | Lowest |
| Best projects | Small/hand-tool | Small-medium | Medium-large | Small-medium |
This is not a safety ranking.
It is a practical fit matrix.
Hand Tools vs. Power Tools in a Small Space
The internet often turns this into an ideological argument.
It should not be one.
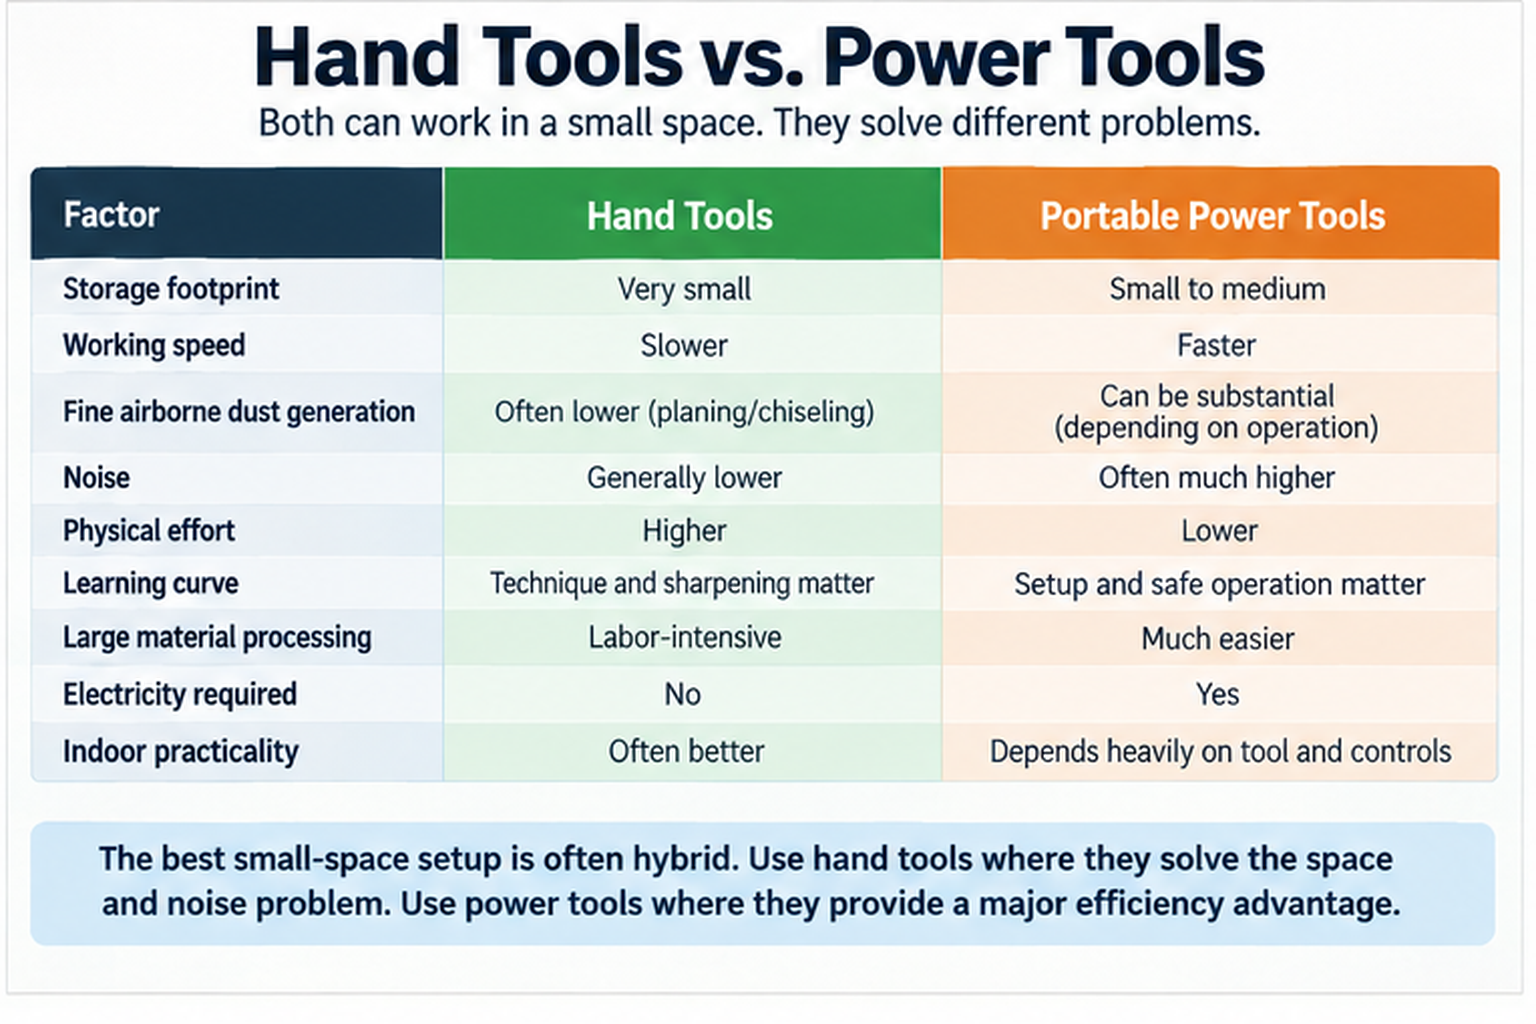
Hand tools and power tools solve different problems.
| Factor | Hand Tools | Portable Power Tools |
|---|---|---|
| Storage footprint | Very small | Small to medium |
| Working speed | Slower | Faster |
| Fine airborne dust generation | Often lower for planing/chiseling | Can be substantial depending on operation |
| Noise | Generally lower | Often much higher |
| Physical effort | Higher | Lower |
| Learning curve | Technique and sharpening matter | Setup and safe operation matter |
| Large material processing | Labor-intensive | Much easier |
| Electricity required | No | Yes |
| Indoor practicality | Often better | Depends heavily on tool and controls |
The best small-space setup is often hybrid.
Use hand tools where they solve the space and noise problem.
Use power tools where they provide a major efficiency advantage.
You do not need to choose a woodworking philosophy.
You need a workable shop.
Wood Dust Is More Than a Cleanup Problem
Dust deserves special attention in small spaces because the woodworking area may also be part of your living area.
OSHA identifies wood dust exposure with respiratory and other health effects and emphasizes local exhaust ventilation as the primary engineering method for collecting dust at or near its source.
NIOSH lists a recommended occupational exposure limit of 1 mg/m³ TWA for wood dust, while OSHA lists an occupational PEL of 15 mg/m³ for total dust and 5 mg/m³ for the respirable fraction.
We should not turn workplace limits into residential rules.
What they do tell us is that fine wood dust is a legitimate exposure hazard, not merely something that makes the furniture dirty.
IARC has classified wood dust as carcinogenic to humans (Group 1), based on evidence including cancers of the nasal cavity and paranasal sinuses in occupationally exposed populations.
What this means for a beginner
If a tool has a dust port, use it with compatible extraction when practical.
Prefer controlling dust where it is generated rather than relying entirely on cleaning the room afterward.
And do not assume that because a woodworking session is short, indoor dust is irrelevant.
Your woodworking space may also contain carpets, upholstered furniture, HVAC returns, and other surfaces that are much harder to clean than a garage floor.
Noise Changes the Workshop You Can Realistically Use
Noise is another reason a tool that works perfectly in a garage may be a poor choice in an apartment.
NIOSH recommends an occupational exposure limit of 85 dBA over eight hours and uses a 3 dB exchange rate. Under that model, the exposure duration corresponding to a full occupational daily dose halves as the sound level increases:
- 85 dBA → 8 hours
- 88 dBA → 4 hours
- 91 dBA → 2 hours
- 94 dBA → 1 hour
We should therefore not use those numbers to decide whether your neighbors should tolerate a router.
They tell us about hearing exposure.
Your building rules and local ordinances answer the neighbor question.
Noise is not only the motor
In shared buildings, impact matters too.
Hammering, mallet work, dropping boards, moving benches, and transferring vibration into floors can all make a woodworking session noticeable outside the room.
That is why “hand tools are quiet” is also an oversimplification.
A hand plane may be unobtrusive.
Chopping a mortise with a mallet may not be.
Choose operations, not just tools.
Workholding: The Problem Beginners Discover Too Late
You can own excellent tools and still have a miserable woodworking setup if the workpiece moves every time you touch it.
Large workshops solve this with heavy benches, vises, assembly tables, and permanent clamps.
Small spaces need different solutions.
Useful options include:
- folding workbench with integrated clamping
- portable vise
- bench hook
- sawhorses
- clamps attached to a sturdy table
- compact low bench
- temporary sacrificial work surface
For hand-tool woodworking, workholding becomes especially important because you are providing the cutting force yourself.
Trying to plane a board on a lightweight folding table that slides across the room is frustrating and potentially unsafe.
The bench does not have to be huge.
It does have to hold the work reliably.
The 4×8 Plywood Problem
One full sheet of plywood measures roughly 4×8 feet.
That is larger than many beginners appreciate until they actually buy one.
The problem is not simply where you will cut it.
You need to consider:
- Can you transport it?
- Can you get it through your doorway?
- Can you turn it through the hallway?
- Can you store it flat or safely on edge?
- Do you have enough room to support it while cutting?
For a small-space woodworker, those questions may be more important than which saw you own.
Solution 1: Buy smaller project panels
Home centers sell multiple plywood and project-panel products in 2×4-foot sizes, which can be significantly easier to transport and manage in a small workspace.
You may pay more per square foot than you would for a full sheet, but convenience can be worth more than material efficiency when storage is limited.
Solution 2: Have the material broken down before transport
Some sheet goods and retailers offer cutting services or custom-cut options, though availability varies by product and store.
Do not design an entire project around a store making furniture-grade precision cuts for you.
Instead, think of those first cuts as transport cuts.
Get the sheet small enough to move and handle safely.
Make your precision cuts later.
Solution 3: Break down sheets outdoors
If you have driveway or patio space, a circular saw with an appropriate guide can be far more practical than trying to maneuver the sheet through a stationary tool.
This is one reason a circular saw is such a strong first power saw for small-space woodworking.
Choose Projects That Match the Shop You Have
A small workshop becomes frustrating when every project fights the space.
For an indoor hand-tool setup, start with projects such as small boxes, organizers, shelves, tool totes, picture frames, stools, and other projects based primarily on dimensional lumber.
A patio or driveway expands the possibilities to shelving, planters, small furniture, workbenches, and plywood-based projects.
A shed gives you even more flexibility because material and tools can remain staged between sessions.
The project should fit the workshop.
The workshop does not need to imitate the project photos you see online.
A Better Small-Space Workflow
Small workshops benefit from discipline more than large workshops do.
- Plan before bringing tools out. Know the cuts, dimensions, and sequence.
- Bring out only the tools required for that operation. You do not need your entire collection on the work surface.
- Cut or shape. Batch similar operations whenever possible.
- Clean before changing operations. Especially after dust-heavy work.
- Put tools back into their assigned storage. This prevents the “temporary workshop” from slowly becoming permanent clutter.
The smaller your workspace, the more valuable this habit becomes.
Where Should You Woodwork?
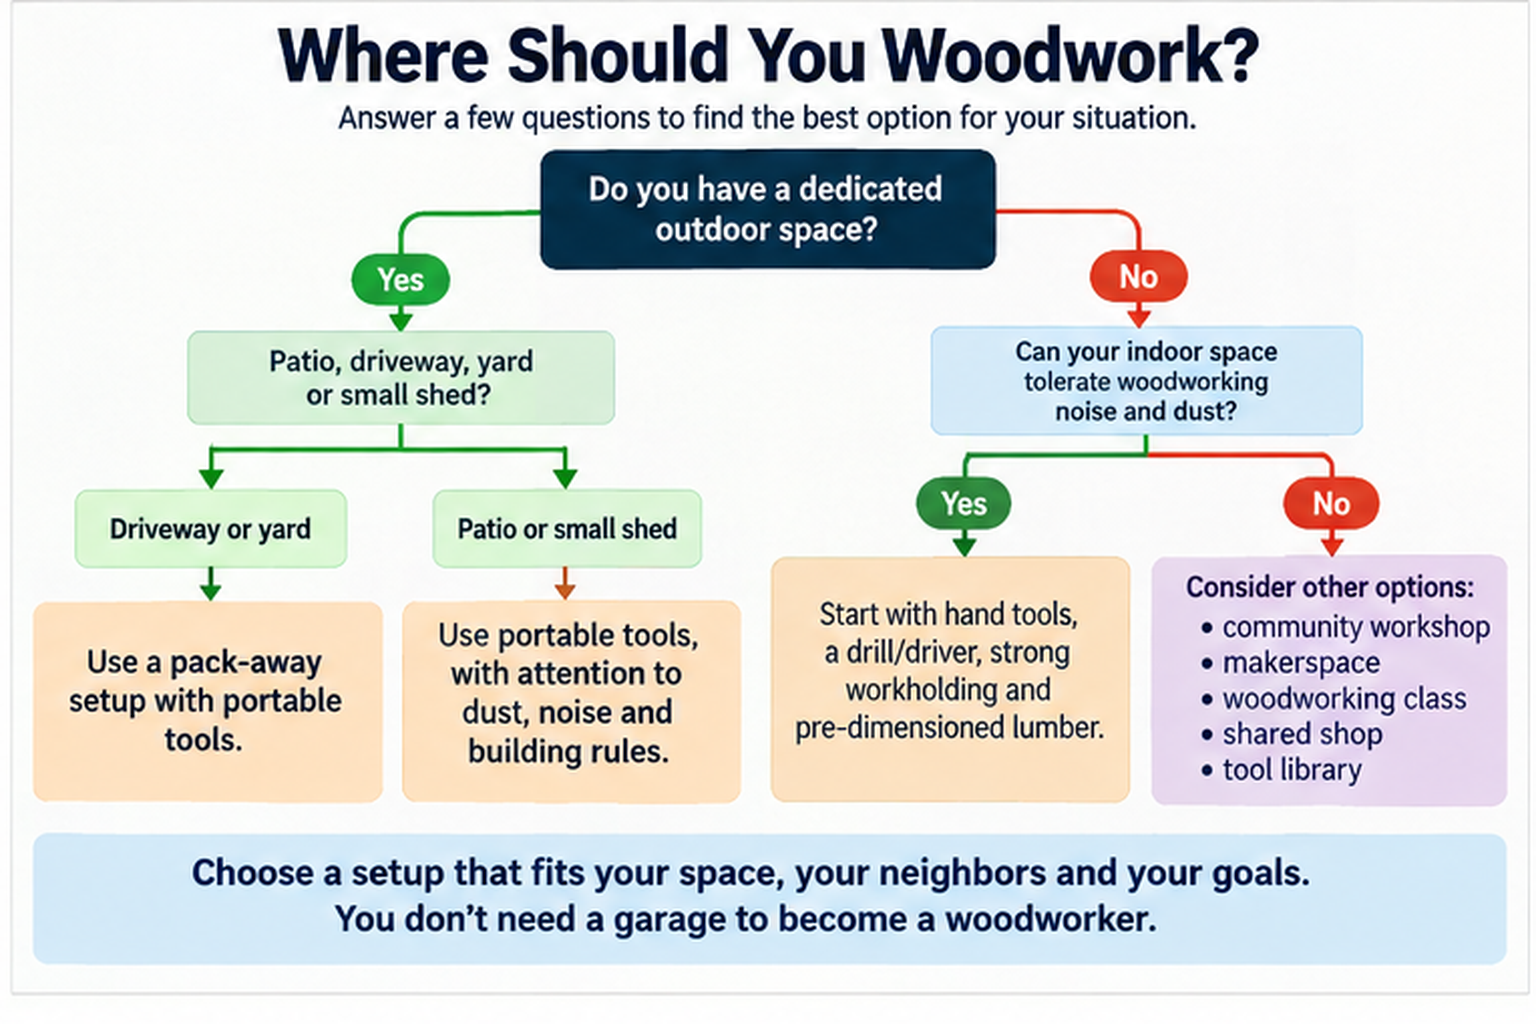
Here is the decision framework we use.
Do you have a dedicated outdoor space?
Yes → A patio, driveway, yard, or small shed gives you the greatest freedom to use portable power tools.
No outdoor space?
Ask the next question.
Can your indoor space tolerate woodworking noise and dust?
If you share walls, floors, ventilation, or living areas, start conservatively.
Prioritize hand tools, a drill/driver, strong workholding, and small pre-dimensioned stock.
Need power tools but cannot reasonably use them at home?
Consider another solution entirely:
- community workshop
- makerspace
- woodworking class
- shared shop
- tool library with workspace
Sometimes the best small-space tool is access to a larger space for one operation.
You can perform the noisy material-processing stage elsewhere and bring manageable components home for assembly and finishing.
You Do Not Need to Build a Tiny Version of Someone Else’s Shop
This may be the most important lesson.
A beginner sees a workshop online and assumes progress means gradually buying everything in it:
table saw, jointer, planer, miter saw station, router table, dust collector, assembly table.
That model works when you have the real estate for it.
In a small space, every tool needs to justify its footprint.
Before buying one, ask:
- What operation does this unlock?
- Can one of my existing tools already do it?
- Where will I use it?
- Where will I store it?
- What dust or noise does it create?
If you cannot answer those questions, you probably do not need the tool yet.
Final Verdict: Start With the Space, Not the Tool List
You can absolutely start woodworking without a garage.
But the best setup depends on where the woodworking will actually happen.
For an apartment or indoor living space, we would lean toward hand tools, compact workholding, pre-dimensioned lumber, and a drill/driver.
For a balcony or patio, portable power tools become more practical, provided dust, noise, building rules, and neighbors are considered.
For a driveway, a pack-away circular-saw-based setup can unlock a surprisingly large range of woodworking projects.
For a small shed, build around storage and workflow first, then add machines only when a project repeatedly justifies them.
You do not need a giant workshop to become a woodworker.
You need enough space to hold the work securely, make the required cuts, control the mess, and put everything away when you are finished.
That is a much smaller requirement.
And for many beginners, it is enough to start this weekend.